Posts

Recording Screen

Picture1

The recording screen allows the client to record evidence before pressing the actual record button. It will also allow the client to auto-stop their video on its own.

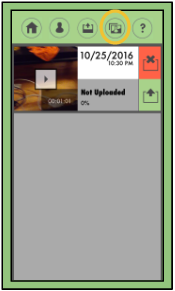
A. Upload Menu: Allows the user/login client to access the upload menu in order to upload their video evidence.
B. Switch Camera View: Allows the user/login client to change the camera from facing the user/login client or away from the user/login client.
C. Buffer-Length: Sets how far back the capture will include before pressing record.
    1. Options:
——> 0 minutes
——> 1 minute
——> 3 minutes
——> 5 minutes

D. Record/Stop: If the user/login client is recording, pressing this button will stop the recording. If camera is not recording, pressing this button will start a recording.
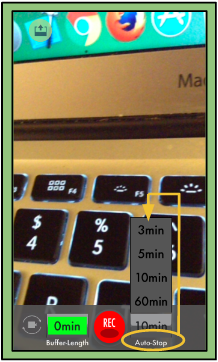
E. Auto-Stop: Sets a timer for when the app will automatically end the app.
    1. Options:
——> 3 minutes
——> 5 minutes
——> 10 minutes
——> 60 minutes

Please note when the app is in recording mode the screen will be outlined in green.

How to Set an Auto-Stop Length

Screen Shot 2017-04-24 at 12.04.12 AMThe Auto-Stop feature allows you to choose how long you’d like the app to record for before it automatically stops.
This allows you to participate in the video without having to manually stop the recording yourself.

1. On the Recording Screen will be the set time of “3 min” for the auto-stop.
2. Tap on the “3 min” button and a menu will pop up showing the options of three minutes, five minutes, ten minutes, and sixty minutes.
3. Tap on the option you would like:
Three minutes will record the three minutes after you hit the record button and then automatically stop recording.

Once you have selected an option you can record your video.

Please note: You may use the Stop button at any time to stop recording your video. You do not have to wait for the auto-stop to occur.


How to Import A File From Your Personal Photo Gallery

This feature allows you to send a personal file from your phone to your personal account on Connect™.

Screen Shot 2017-04-23 at 11.21.34 PM1. Open the app, which will bring you to the recording screen.
2. Tap the Upload button on the top left corner to bring you to the uploading screen.
3. Press the second to last button on the toolbar to access your personal photo gallery (shown at right).
4. Choose the file you wish to upload.
5. Wait for your file to finish compressing.
6. Once finished, you can continue uploading the file as you would normally (click here for more information on uploading).

Please note: A popup will occur with a HIPAA recommendation after the file is compressed. Press the “Ok” button to continue uploading.