
File Organizer
The File Organizer is where all login users can manage all of their files. It provides a place to store and view uploaded files and work on a client’s portfolio and to collaborate with other users associated with that client.
File Organizer’s Location:
- Click on “Actions” on the main toolbar.
- Select “File Organizer”.
- The File Organizer pop-up window will open.
Features

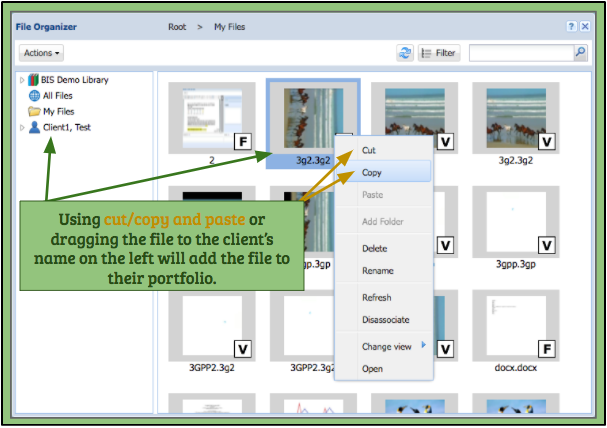
1. Actions Tab
– Cut: Allows a user to select a file and cut it to be pasted in another location.
– Copy: Allows a user to create a replica of a file and paste the replica in another location.
+ “Dragging and Dropping” a file also creates a copy of the file.
+ When creating a copy of a new file, a window will pop up (see bottom image) allowing you to create a copy with or without previously used Tags, Keywords, Comments, and Associated Files. To remove any one of these, uncheck the box next to the item you want removed.
– Paste: Allows a user to place a cut or copied file within a certain folder.
– Add Folder: Allows a user to add a new folder within another folder.
– Delete: Allows a user to delete a file or a folder.
– Rename: Allows a user to rename a file or folder that they have created or uploaded.
– Refresh: Updates the view and files within the File Organizer window.
+ If a user uploaded a file and does not see it in an appropriate amount of time, they should click the refresh button. This will refresh the view of the current files available.
– Disassociate: Allows a user to remove a client portfolio from the File Organizer window.
 – Change View: Allows a user to modify the viewing options of the files by any of the following:
+ Thumbnails
+ Details
+ List
– Open: Allows a user to open a selected file.
+ Double-clicking on a file will also open the file.
2. Library
– Admins and Group System Admins can place relevant documents in the Library for all account users, excluding login clients.
– All other specified users have read-only access to this folder.
– Yhe user can also click on the Library icon in the main box of the file organizer to open it.
3. All Files
– Provides a user with a view of all permissible files at one time. This makes it easier to find files without having to search through specific clients and folders.
– The user can also click on the All Files icon in the main box of the file organizer to open it.
– For more details on this feature, click here.
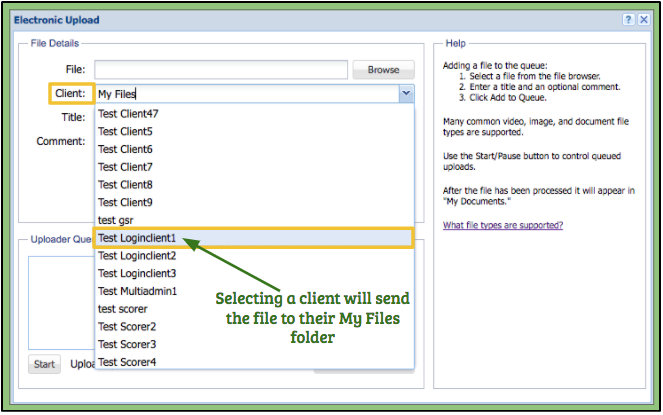
4. My Files
– This folder contains documents and files visible only to the user who is logged in.
– All documents and files uploaded by the user will appear here unless they select a client’s portfolio and upload directly to the client’s account.
– The user can also click on the My Files icon in the main box of the file organizer to open it.
– Users can create and manage additional folders within their My Files folder.
5. Search Field
– The search field allows the user to search for files by title from the selected folder. The filter tab can open to an advanced search feature.
– Advanced search criteria includes:
a. Organization
b. Group
c. Location
d. Role
e. User/Client
f. ID Number
g. File Type
h. Tags
i. Keywords
j. Updated Between
Please note: When a user opens a client’s portfolio, it will appear as an icon as well as in the list of folders on the left.