Update Profile

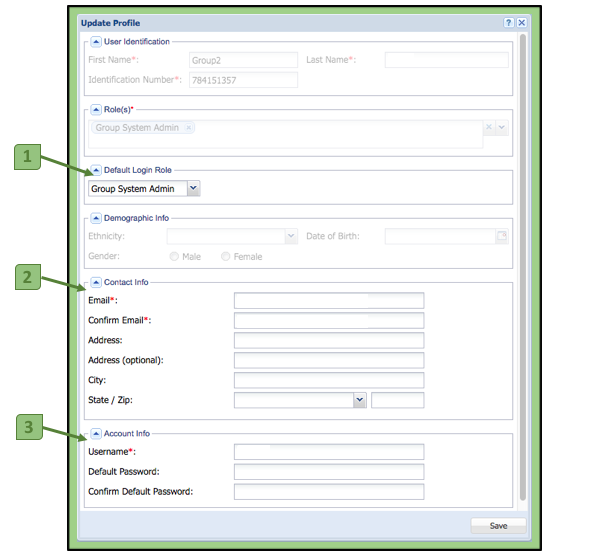
The Update Profile is a way to edit your current profile


1. Default Login Role

Ability to change

  1. Default Login Role

A user has the ability to change their default login role. For example, if a user has the dual role of a User and an Admin, they can choose which of those roles they would prefer to always have the system open up to.


2. Contact Info:

Ability to change

  1. Email
  2. Address
  3. City
  4. State/zip

3. Account Info:

Ability to change

  1. Username
  2. Password


Uploading Files

There are three methods for uploading files and artifacts:

1. Electronic Uploader
– The Electronic Uploader allows a user to upload files and artifacts already available on the user’s computer. Click here for directions on how to use this feature.

2. Fax Uploader
– The Fax Uploader allows a user to upload documents that they have physically on their persons and want to add to their library on the system. Click here for directions on how to use this feature.

3. Behavior Capture™
– This method is available in the Apple App Store. The Behavior Capture™ App is a versatile recording and uploading tool. A user can securely capture events from back in time and in-the-moment behaviors and upload to their Behavior Connect™ account. Bluetooth remote controls also provide flexibility in recording.

Upload Times

When uploading videos, the file size and network speed determine how fast your upload will be.

To get a general idea of how long your video will take to upload, use an uploading calculator and type in the size of your file and find the speed of your internet in the list.

To find out the speed of your internet, you can use a speed test to find the exact number.

One way to increase your uploading speed is to compress your files to be smaller or to record your videos with a lower resolution. There are a lot of third party softwares that compresses videos.

If you are able to use the Behavior Capture app then this also compresses videos on iPhones and iPads.

Once your videos are “encoding” they are in the system and it will begin making them web ready.
You can log out at this point if you wish and wait for the system to email you when it is available.

File Organizer

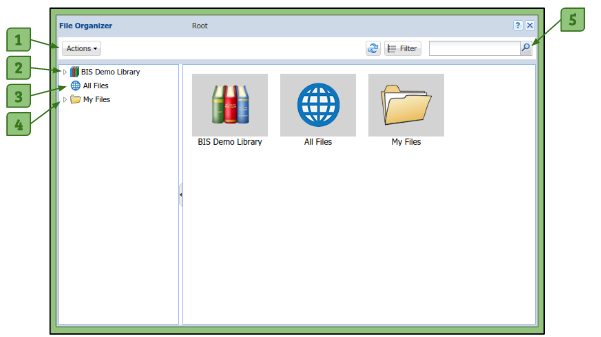
The File Organizer is where all login users can manage all of their files. It provides a place to store and view uploaded files and work on a client’s portfolio and to collaborate with other users associated with that client.

File Organizer’s Location:

  1. Click on “Actions” on the main toolbar.
  2. Select “File Organizer”.
  3.  The File Organizer pop-up window will open.

Features

Screen Shot 2017-03-08 at 11.31.36 PM

Screen Shot 2017-03-08 at 11.24.05 PM

1. Actions Tab
– Cut: Allows a user to select a file and cut it to be pasted in another location.
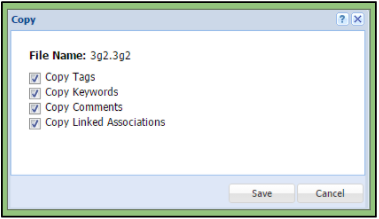
Copy: Allows a user to create a replica of a file and paste the replica in another location.
+ “Dragging and Dropping” a file also creates a copy of the file.
+ When creating a copy of a new file, a window will pop up (see bottom image) allowing you to create a copy with or without previously used Tags, Keywords, Comments, and Associated Files. To remove any one of these, uncheck the box next to the item you want removed.
Paste: Allows a user to place a cut or copied file within a certain folder.
Add Folder: Allows a user to add a new folder within another folder.
Delete: Allows a user to delete a file or a folder.
Rename: Allows a user to rename a file or folder that they have created or uploaded.
Refresh: Updates the view and files within the File Organizer window.
+ If a user uploaded a file and does not see it in an appropriate amount of time, they should click the refresh button. This will refresh the view of the current files available.
Disassociate: Allows a user to remove a client portfolio from the File Organizer window.

Screen Shot 2017-03-08 at 11.26.48 PMChange View: Allows a user to modify the viewing options of the files by any of the following:
+ Thumbnails
+ Details
+ List
Open: Allows a user to open a selected file.
+ Double-clicking on a file will also open the file.

2. Library

Admins and Group System Admins can place relevant documents in the Library for all account users, excluding login clients.
– All other specified users have read-only access to this folder.
– Yhe user can also click on the Library icon in the main box of the file organizer to open it.

3. All Files
– Provides a user with a view of all permissible files at one time. This makes it easier to find files without having to search through specific clients and folders.
– The user can also click on the All Files icon in the main box of the file organizer to open it.
– For more details on this feature, click here.

4. My Files
– This folder contains documents and files visible only to the user who is logged in.
– All documents and files uploaded by the user will appear here unless they select a client’s portfolio and upload directly to the client’s account.
– The user can also click on the My Files icon in the main box of the file organizer to open it.
– Users can create and manage additional folders within their My Files folder.

5. Search Field

– The search field allows the user to search for files by title from the selected folder. The filter tab can open to an advanced search feature.
Advanced search criteria includes:
a. Organization
b. Group
c. Location
d. Role
e. User/Client
f. ID Number
g. File Type
h. Tags
i. Keywords
j. Updated Between


Please note: When a user opens a client’s portfolio, it will appear as an icon as well as in the list of folders on the left.


Reports

The Admin role is the only role that has access to Reports. The reports provide data to best manage and support the organization. Custom reports can be requested. They can be found in the dropdown menu on the main toolbar.

Report Types


Tag Report

Columns:

  1. Date Tag was Added.
  2. User/Client File Resides.
  3. File Name.
  4. Folder Name.
  5. Tag Name.
  6. Tag’s Time in Video.
  7. Details.
  8. Tag Author.
  9. Group.
  10. Location.

Keyword Report

Columns:

  1. Date Keyword was Added.
  2. User/Client File Resides.
  3. File Name.
  4. Folder Name.
  5. Keyword Name.
  6. Keyword Author.
  7. Group.
  8. Location.

Generic IRR Report

Columns:

  1. Client ID.
  2. Group.
  3. Location.
  4. File.
  5. Role.
  6. Scorer ID.
  7. Tags Added.
  8. Percent Correct to Gold Standard.
  9. Exact compared to all Scorers.
  10. Not matched compared to all Scorers.

Files Report

Columns

  1. File ID.
  2. File Name.
  3. File Type.
  4. User Uploaded.
  5. User/Client that File Resides.
  6. Location.
  7. File Creation Time.
  8. File Last Modified.
  9. Length in Seconds.
  10. Size in Bytes.

The Encoding Process

After a file is uploaded, the word “encoding” will appear next to it.

All  files uploaded to the system go through the process of encoding. This process is when the file is being converted to a specific file extension, such as PDF, JPG, and WMV. The length of the video or the size of the file will be the deciding factor in how long the encoding process will take.

This process must be done in order for files to be viewed and played on the system.

Supported File Types

The Electronic Uploader supports the file types listed below:


1. Image Formats
2. Video Formats
3. Document Formats
4. Audio Formats


Image Formats:

  • JPG
  • PNG
  • GIF

Video Formats:

    • ASF
    • AVI
    • DAT
    • DIVX
    • DV
    • FLV
    • F4V
    • MKV
    • MOD
    • MOV
    • MPE
    • MPEG
    • MPEG4
    • MPG
    • MTS
    • M2TS
    • MP4
    • M4A
    • M4V
    • NSV
    • OGA
    • OGV
    • QT
    • TOD
    • TS
    • WAV
    • WEBM
    • WMV

    • 3GP
    • 3G2
    • 3GPP


    Please note: All video files will be converted to FLV, OGG & MP4 format.


    Document Formats:

      • PDF
      • PPT
      • PPTX
      • DOC
      • DOCX

      • XLS
      • XLSX.


      Please Note: All document files will be converted to PDF format.


      Audio Formats:

      • AAC
      • ADP
      • AIF
      • AU
      • DRA
      • DTS
      • DTSHD
      • EOL
      • LVP
      • MID
      • MPGA
      • MP4A
      • MP3
      • M3U
      • OGA
      • PYA
      • RAM
      • RIP
      • RMP
      • WAV
      • WAX
      • WEBA
      • WMA

      Client Selector

      The Client Selector is available to the User, Scorer, and Gold-Standard Rater roles. It provides a list of the clients that the administrators have given permission to a user to have access to.
      The Client Selector will appear once the user logs into the system and can be accessed again via the Action tab on the main toolbar.


      Selecting a Client

      1. All clients associated to the user are populated in this window.
      2. The user selects the client they want to access from the list
      3. Either double-clicking on the client’s name or going to the Actions tab and clicking Open will allow access to the client.
      4. The client’s portfolio will appear in the user’s File Organizer providing a place to view the client’s data.


      Client Selector’s Features
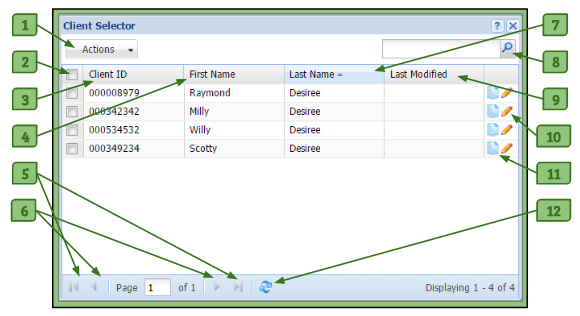
      453


      Screen Shot 2017-02-26 at 9.33.07 PM1. Actions Menu
      – Allows the user to open a client’s portfolio or configure their notifications for that client after selecting them from the Client Selector.

      2. Checkbox
      – Allows the user to select a client and use the Action dropdown button to open the client’s portfolio or configure the notifications attached to the client’s profile.

      3. Client ID Column
      – Lists the identification number of the client.

      4. First/Last Page Buttons
      – Allows the user to either skip to the first page or last page of the Client Selector.

      5. Previous/Next Page Buttons
      – Allows the user to go the previous page or the next page.

      6. Refresh Button
      – Allows the user to refresh the Client Selector to see the most up-to-date changes.

      7. First Name Column
      – Lists the first name of the client.

      8. Last Name Column
      – Allows the user to list the clients by ascending/descending order of a particular column.

      9. Last Modified
      – Shows the date and time the client was last updated/edited.

      10. Pencil Icon
      – Allows the user to edit the notification settings that the user will receive regarding that client.

      11. Notepad Icon
      – Allows the user to view the client’s Client Notepad.

      12. Search Field
      – Allows the user to search for a specific client by using their Client ID, last name, or first name.


      Organizing the Client Selector
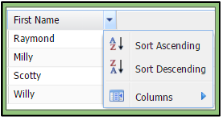
      Screen Shot 2017-02-26 at 9.27.12 PM

      When hovering over a column header in the Client Selector, an arrow will appear in the right corner of the column header. Clicking on it will create a dropdown menu, where you can choose to list the clients by ascending/descending order for that particular column. Another dropdown menu, titled Columns, allows you to check and uncheck columns which you would like to hide or view in your Client Selector.

      System Admin Window

      The System Admin window provides administrators the ability to add, edit, and delete all users and clients within the system. It also provides access to all files within the organization’s Enterprise Account.

      The System Admin window has three main parts to it:
      1. Main Table
      2. Actions Tab
      3. Group Associations Table


      Main Table

      The Main Table of the System Admin allows for selecting a user of any role or a client. All users are listed here.
      Double Clicking on a client will place the client’s portfolio in the Admin’s File Organizer. The page cycling options at the bottom allow you to view other users on different pages.

      Screen Shot 2017-03-08 at 11.43.29 PM

      The column headings of the users table, in order, includes:
      1. Identification Number
      2. First Name
      3. Last Name
      4. Organization
      5. Group
      6. Location
      7. Role
      8. Email
      9. User/Associated Users
      10. Sysname (Name of URL)

      When hovering over a column heading, a down arrow will appear on the far right side of heading title. Clicking on the down arrow will allow the user to change the order in which the clients are sorted. It will also allow the user to hide or show each of the column types.


      Screen Shot 2017-03-08 at 11.24.05 PMActions Tab

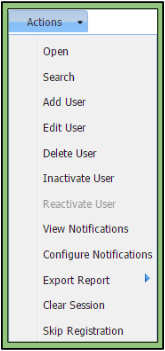
      1. Open:
      – After using the checkbox to select a user from the adjacent users table, this action will open the File Organizer and display the user’s portfolio.
      2. Search:
      – The search can be used to search/filter multiple types of criteria. Click here for more information about search options.
      3. Add User:
      – Allows Admin to create another user/client in the system. Both Personal Details and Group Association tabs need to be filled out in order to add a user.
      4. Editing a User:
      – Using the checkbox to select a user from the users’ table of the System Admin with this action allows an Admin to edit information in the user’s/client’s profile. Clicking on the pencil on the users table also provides the Admin a way to edit profile.
      5. Deleting a User:
      – Using the checkbox to select a user from the users table and then clicking this action allows an Admin to delete the user’s/client’s profile. Clicking on the ”X” on the users table will also allow the Admin a way to delete the user/client.
      6. Inactivate User:
      – Using the checkbox to select a user from the users table with this action allows an Admin to inactivate a user’s/client’s profile. Inactivating the user/client will allow the Admin to keep the portfolio within the system, but not active to access or login.
      7. Reactivate User:
      – Using the checkbox to select a user from the users table with this action allows an Admin to reactivate a user’s/client’s profile. Reactivating the user/client will activate that user/client that was inactive back to their active status and accessibility.
      8. View Notifications:
      – Using the checkbox to select a user from the users table with this action allows an Admin to review all notifications that were set by the Admin for a user’s or client’s portfolio.
      9. Configure Notifications:
      – This allows the Admin the ability to configure what notifications they will receive per user/client.
      10. Export Report:
      – This allows the Admin the ability to download the search results from the users table into a CSV file.
      11. Clear Session:
      – This allows the Admin the function to clear any user’s session if they logged out incorrectly and are not able to log in. This will clear their session immediately so they don’t have to wait the 10 minutes for the system to automatically clear their session to log in.
      12. Skip Registration:
      – Using the checkbox to select a user/users from the table with this action allows an Admin to remove the steps of registering on the site for that user. They will not have to recreate their password, username, or add in their email address before first using the system. You must add an email address in order for your user to receive any notifications. A reminder will pop-up after clicking this box.


      Screen Shot 2017-03-08 at 11.41.59 PMGroup Association Table

      The Group Association Table allows the Admin to view users and clients via their Group Associations.

      – The table allows the Admin to select from the Organization, Group, Location, and/or Role levels.
      – It also allows for a quick search to populate the adjacent Users Window with Clients, Users, Scorers, or Gold Standard Raters that are associated to each other.
      – The Admin can use the checkboxes to define the search parameters and the “+” signs to delve into the selection.