Uploading Files

There are three methods for uploading files and artifacts:

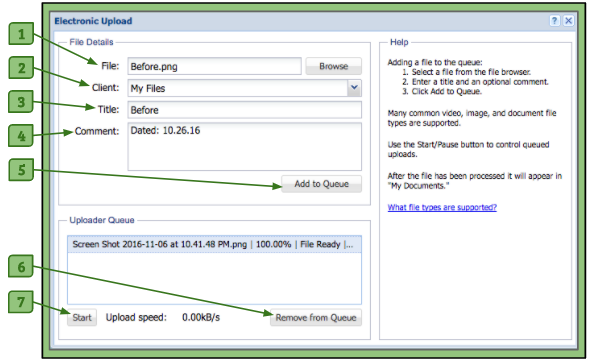
1. Electronic Uploader
– The Electronic Uploader allows a user to upload files and artifacts already available on the user’s computer. Click here for directions on how to use this feature.

2. Fax Uploader
– The Fax Uploader allows a user to upload documents that they have physically on their persons and want to add to their library on the system. Click here for directions on how to use this feature.

3. Behavior Capture™
– This method is available in the Apple App Store. The Behavior Capture™ App is a versatile recording and uploading tool. A user can securely capture events from back in time and in-the-moment behaviors and upload to their Behavior Connect™ account. Bluetooth remote controls also provide flexibility in recording.

Upload Times

When uploading videos, the file size and network speed determine how fast your upload will be.

To get a general idea of how long your video will take to upload, use an uploading calculator and type in the size of your file and find the speed of your internet in the list.

To find out the speed of your internet, you can use a speed test to find the exact number.

One way to increase your uploading speed is to compress your files to be smaller or to record your videos with a lower resolution. There are a lot of third party softwares that compresses videos.

If you are able to use the Behavior Capture app then this also compresses videos on iPhones and iPads.

Once your videos are “encoding” they are in the system and it will begin making them web ready.
You can log out at this point if you wish and wait for the system to email you when it is available.

The Encoding Process

After a file is uploaded, the word “encoding” will appear next to it.

All  files uploaded to the system go through the process of encoding. This process is when the file is being converted to a specific file extension, such as PDF, JPG, and WMV. The length of the video or the size of the file will be the deciding factor in how long the encoding process will take.

This process must be done in order for files to be viewed and played on the system.

Supported File Types

The Electronic Uploader supports the file types listed below:


1. Image Formats
2. Video Formats
3. Document Formats
4. Audio Formats


Image Formats:

  • JPG
  • PNG
  • GIF

Video Formats:

    • ASF
    • AVI
    • DAT
    • DIVX
    • DV
    • FLV
    • F4V
    • MKV
    • MOD
    • MOV
    • MPE
    • MPEG
    • MPEG4
    • MPG
    • MTS
    • M2TS
    • MP4
    • M4A
    • M4V
    • NSV
    • OGA
    • OGV
    • QT
    • TOD
    • TS
    • WAV
    • WEBM
    • WMV

    • 3GP
    • 3G2
    • 3GPP


    Please note: All video files will be converted to FLV, OGG & MP4 format.


    Document Formats:

      • PDF
      • PPT
      • PPTX
      • DOC
      • DOCX

      • XLS
      • XLSX.


      Please Note: All document files will be converted to PDF format.


      Audio Formats:

      • AAC
      • ADP
      • AIF
      • AU
      • DRA
      • DTS
      • DTSHD
      • EOL
      • LVP
      • MID
      • MPGA
      • MP4A
      • MP3
      • M3U
      • OGA
      • PYA
      • RAM
      • RIP
      • RMP
      • WAV
      • WAX
      • WEBA
      • WMA

      Electronic Uploader

      The Electronic Uploader is where a user can upload files that are on their computer to the site. The files can be placed in the user’s own My Files folder or a client’s My Files folder.

      12313


      1. File/Browse Button
      – When clicked, it accesses the files on the user’s computer in order add one to their File Organizer.

      2. Client Drop-Down Menu
      – Allows the user to choose the destination of the file they are uploading.

      3. Title Field
      – Allows the user to add a title to their file other than what it is named on the computer.

      4. Comment Field
      – Allows the user to add any notes they’d like other users who can access their file to see.

      5. Add to Queue Button
      – When clicked, starts the uploading of the file if there are no others being uploaded or adds it to the list of files that will be uploaded.

      6. Remove from Queue Button
      – Allows the user to remove any file that has finished uploading, is waiting to be uploaded, or is in the process of being uploaded from the queue.

      7. Start/Pause Button
      – Allows the user to start/pause any files at any time that are currently being uploaded to the File Organizer. Only one file may be uploaded at a time.


      Adding a File to the Queue

      1. Select a file from the file browser.

      2. Select a client (optional).

      3. Enter a new title (optional).

      4. Enter a comment (optional).

      5. Click the Add to Queue button.

      Please Note:
      1. All files will be uploaded to the user’s own My Files folder if a client is not selected.
      2. Users may need to unblock pop-ups and click Run on windows that open. This depends on which browser and which security settings are being used.
      3. Users should not close the Electronic Uploader window while there are active uploads. If closed, this will stop the upload process. However uploading will resume if once the window is reopened.
      4. If a wrong file is selected and needs to be removed, users can click on the file in the upload queue and then click the Remove from the Queue button.


      Fax Uploader

      The Fax Uploader allows a user to create a coversheet in order to fax a document to the system and add it to their File Organizer.

      Screen Shot 2016-11-06 at 11.55.33 PM

      1. Within the fax upload window, there are two boxes in which to enter information:
      Title Field: A place for the user to enter the name of the file.
      Comment Field: A place for the user to add any notes they’d like other users who can access their file to see (optional).

      2. After filling out the information, the user will click the Create Fax Cover button.

      3. This brings up a created PDF file with the username of the user and the title and the comment previously filled out.

      4. Clicking on the printer button on the menu bar will print out the fax upload form.

      5. The user must follow the instructions printed on it to fax their complete document.

      6. The file will be uploaded into the user’s My Files folder.

      Please Note:
      The user needs to include the fax coversheet with the document they are faxing.