Posts

Setting Up to Receive Notifications

Notifications are an easy way for a user to stay on top of changes to their clients. If a user has access to a client, they can set up to receive specific notifications for them.  Administrative roles can also be notified of changes to all user roles available in the System Admin window. There is more information about the specifics of the Notification Settings page.

1


4Setting Notifications Using the Client Selector (User Roles)

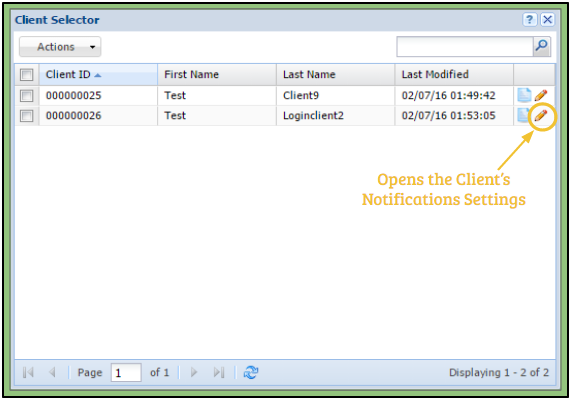
1. The user opens the Client Selector.
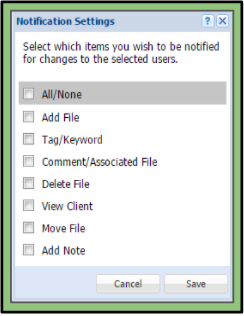
2. Clicking the pencil icon next to the desired client will open their Notification Settings.
3. The user can then check the checkboxes next to the options they want to be notified of.
4. Pressing save will save the changes and the user will then:
A. Receive an email whenever one of the changes selected occur.
B. Have their notifications tab turn red whenever one of the changes selected occur.


5Setting Notifications Using the System Admin Window (Administrative Roles)

1. The user opens the System Admin window.
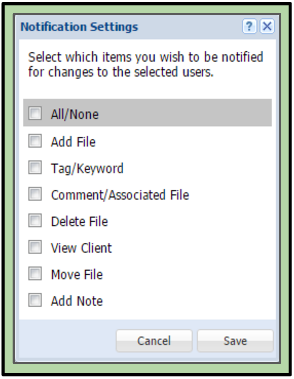
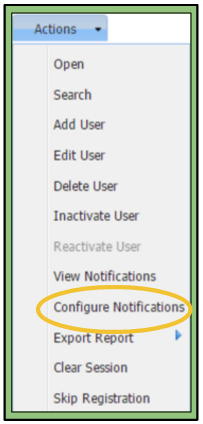
2. They then can check the checkbox next to the desired user or client.
3. Going to the Actions tab in the upper left-hand corner and clicking “Configure Notifications” will open their Notification Settings.
4. The user can then check the checkboxes next to the options they wish to be notified of.
5. Pressing save will save the changes and the user will then:
A. Receive an email whenever one of the changes selected occur.
B. Have their notifications tab turn red whenever one of the changes selected occur.

Notification Settings

The Notification Settings window pops up after clicking on the actions tab of the System Admin (available for Admins, Group System Admins, and Group Admins)  or the actions tab in the Client Selector (available for Users, Scorers, and Gold Standard Raters). This window allows the Admin the ability to configure what notifications they will receive per user/client.


Prefigured Notifications

When a new user/client is added to the system, they are prefigured with the notifications of the following:
– Add File
– Add Tag/Keyword
– Add Comment/Associated File
– Add Note
This is the case for all users except the Admin themselves. The Admin must configure all notifications for the users for which options they want notifications for.


Available Notification Settings

Screen Shot 2017-03-08 at 9.01.40 PM

1. All/None
2. Add File
3. Tag/Keyword
4. Comment/Associated file
5. Delete File
6. View Client
7. Move File
8. Add Note

Check the boxes for which actions each individual user wants to be notified of. An email will be sent to the user notifying them that an action has occurred as well as turning the Notifications button red on the main toolbar on the site.

Client Notepad Feature

The Client Notepad allows users with permissions to create and view notes regarding a client.

All users and admins associated with this client will have access to these notes.
Login Clients are capable of viewing notes that a user makes available to them.


Client Notepad’s Location

The Client Notepad can be found in the System Admin feature for Admins, Group System Admins, and Group Admins.
– After opening the System Admin, to the right in the columns of each user is a notepad which can be accessed.

Users can find the Client Notepad in the Client Selector.
– Each client will have a notepad icon in their column.
Login Clients can access their Client Notepad through their Notifications tab.


Adding a Note

1. The user clicks on a client’s notepad.
2. They then type a note in the top text field.
3. The user chooses if the note is intended for the client to read.
– If so, the user clicks on the Client Readable checkbox.
4. The user reviews their note and clicks on the Post button.


Client Notepad Diagram

54343

1. Text Box
– The user writes in the note to be recorded here.

2. User’s Name
– The first line on the recorded note is the name of the user that authored it.

3. Date/Time Stamp
– This stamp shows when the user created the note.

4. Note
– This is the text of the note that has been submitted by the user.

5. Post Button
– By pressing this button it will submit the text to the left as a note.

6. Client Readable Checkbox
– By checking this box, it allows a login client to view the note the user is posting. A pop-up window will occur when this box is selected reminding the user that the client will be able to view the note.
Please note: Clients that are not login clients will not have this option available on their notepad.

7. Head Symbol
– This symbol marks the notes that can be viewed by the login client.