Client Selector

The Client Selector is available to the User, Scorer, and Gold-Standard Rater roles. It provides a list of the clients that the administrators have given permission to a user to have access to.
The Client Selector will appear once the user logs into the system and can be accessed again via the Action tab on the main toolbar.


Selecting a Client

1. All clients associated to the user are populated in this window.
2. The user selects the client they want to access from the list
3. Either double-clicking on the client’s name or going to the Actions tab and clicking Open will allow access to the client.
4. The client’s portfolio will appear in the user’s File Organizer providing a place to view the client’s data.


Client Selector’s Features

453


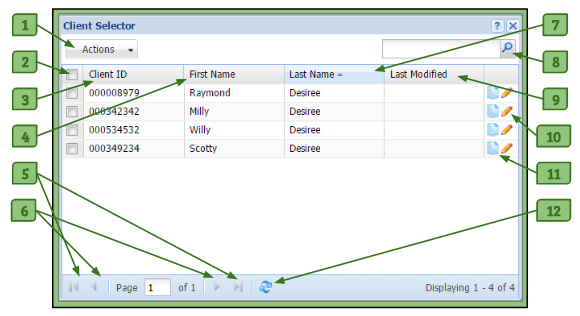
Screen Shot 2017-02-26 at 9.33.07 PM1. Actions Menu
– Allows the user to open a client’s portfolio or configure their notifications for that client after selecting them from the Client Selector.

2. Checkbox
– Allows the user to select a client and use the Action dropdown button to open the client’s portfolio or configure the notifications attached to the client’s profile.

3. Client ID Column
– Lists the identification number of the client.

4. First/Last Page Buttons
– Allows the user to either skip to the first page or last page of the Client Selector.

5. Previous/Next Page Buttons
– Allows the user to go the previous page or the next page.

6. Refresh Button
– Allows the user to refresh the Client Selector to see the most up-to-date changes.

7. First Name Column
– Lists the first name of the client.

8. Last Name Column
– Allows the user to list the clients by ascending/descending order of a particular column.

9. Last Modified
– Shows the date and time the client was last updated/edited.

10. Pencil Icon
– Allows the user to edit the notification settings that the user will receive regarding that client.

11. Notepad Icon
– Allows the user to view the client’s Client Notepad.

12. Search Field
– Allows the user to search for a specific client by using their Client ID, last name, or first name.


Organizing the Client Selector

Screen Shot 2017-02-26 at 9.27.12 PM

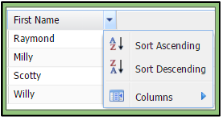
When hovering over a column header in the Client Selector, an arrow will appear in the right corner of the column header. Clicking on it will create a dropdown menu, where you can choose to list the clients by ascending/descending order for that particular column. Another dropdown menu, titled Columns, allows you to check and uncheck columns which you would like to hide or view in your Client Selector.

Electronic Uploader

The Electronic Uploader is where a user can upload files that are on their computer to the site. The files can be placed in the user’s own My Files folder or a client’s My Files folder.

12313


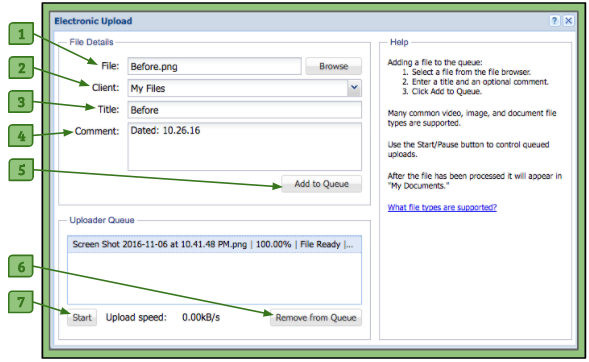
1. File/Browse Button
– When clicked, it accesses the files on the user’s computer in order add one to their File Organizer.

2. Client Drop-Down Menu
– Allows the user to choose the destination of the file they are uploading.

3. Title Field
– Allows the user to add a title to their file other than what it is named on the computer.

4. Comment Field
– Allows the user to add any notes they’d like other users who can access their file to see.

5. Add to Queue Button
– When clicked, starts the uploading of the file if there are no others being uploaded or adds it to the list of files that will be uploaded.

6. Remove from Queue Button
– Allows the user to remove any file that has finished uploading, is waiting to be uploaded, or is in the process of being uploaded from the queue.

7. Start/Pause Button
– Allows the user to start/pause any files at any time that are currently being uploaded to the File Organizer. Only one file may be uploaded at a time.


Adding a File to the Queue

1. Select a file from the file browser.

2. Select a client (optional).

3. Enter a new title (optional).

4. Enter a comment (optional).

5. Click the Add to Queue button.

Please Note:
1. All files will be uploaded to the user’s own My Files folder if a client is not selected.
2. Users may need to unblock pop-ups and click Run on windows that open. This depends on which browser and which security settings are being used.
3. Users should not close the Electronic Uploader window while there are active uploads. If closed, this will stop the upload process. However uploading will resume if once the window is reopened.
4. If a wrong file is selected and needs to be removed, users can click on the file in the upload queue and then click the Remove from the Queue button.


Fax Uploader

The Fax Uploader allows a user to create a coversheet in order to fax a document to the system and add it to their File Organizer.

Screen Shot 2016-11-06 at 11.55.33 PM

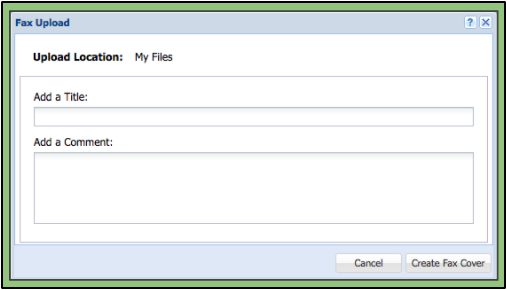
1. Within the fax upload window, there are two boxes in which to enter information:
Title Field: A place for the user to enter the name of the file.
Comment Field: A place for the user to add any notes they’d like other users who can access their file to see (optional).

2. After filling out the information, the user will click the Create Fax Cover button.

3. This brings up a created PDF file with the username of the user and the title and the comment previously filled out.

4. Clicking on the printer button on the menu bar will print out the fax upload form.

5. The user must follow the instructions printed on it to fax their complete document.

6. The file will be uploaded into the user’s My Files folder.

Please Note:
The user needs to include the fax coversheet with the document they are faxing.

Roles and Descriptions

The following roles are flexible to fit many organizations, schools and/or studies.

Client The client is the subject, student, or patient.

  • Clients can have files and assessments associated with them.
  • The client has no login or direct access to files and assessments.

Login Client This is a client that has the ability to login and upload files.

  • Login Client is only able to see and have access to all folders, files, and metadata under their “My Document” folder.
  • All Users that have access to the Login Client will be able to see and have access to all folders, files, and metadata under the client’s profile.
    • Note: For users to have access to client/login client profiles, the admin will need to add the association of user(s) within the client/login client role.

User The user can be a clinician, teacher, or caregiver. This is the core role for accessing the Behavior Connect™ system.

  • Users can choose different clients in the “Client Selector” that they have been assigned to by the admin.
  • Users can view other data associated to the clients by other roles.

Scorer The scorer role is similar to the user role but can only see metadata that they themselves have added to the client.

  • The scorer can complete assessments on a client and that scoring data can be compared with other scorers by other roles.

Gold Standard Rater – This role is designed to show comparison and differences between the scorers’ organizational tags.

  • The Gold Standard Rater has the same permissions as a scorer other than access to the Library in the File Organizer and the Notifications feature.

Group Admin – This role has access to multiple users and clients within a larger “group”. The group may be an individual site, an entire state, or a dispersed group of users.

  • Group admins cannot delete, edit or add users.
  • Group admins can only see users, clients, and libraries in their particular group.

Group System Admin – Like the group admin, the group system admin has access to multiple users and clients that are associated to their “group”.

  • Unlike the group admin, the group system admin can add and edit users and clients.
  • Group system admins have access to the whole system.

Admin – The admin is the account holder for the system.

  • The admin has complete access to the entire account.
  • Admins can add new roles and edit existing ones.
  • Admins can associate clients to users and users to groups.

NODA Autism Diagnosis in the News

BusinessWire.ca-en
BusinessWire.ca-fr
Cablevision/Optonline
CEO World News
EMONEYDAILY
FreshNews.com
Green Faucet
heraldonline.com
International Business Times
ITBriefing.net
KGPE CBS-47
Money Show
Quoteline
Virtual Strategy Magazine