Posts

Electronic Uploader

The Electronic Uploader is where a user can upload files that are on their computer to the site. The files can be placed in the user’s own My Files folder or a client’s My Files folder.

12313


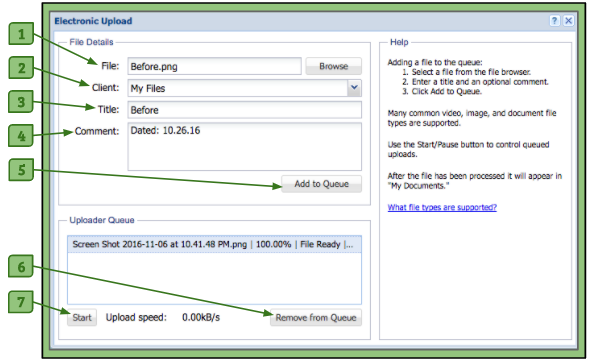
1. File/Browse Button
– When clicked, it accesses the files on the user’s computer in order add one to their File Organizer.

2. Client Drop-Down Menu
– Allows the user to choose the destination of the file they are uploading.

3. Title Field
– Allows the user to add a title to their file other than what it is named on the computer.

4. Comment Field
– Allows the user to add any notes they’d like other users who can access their file to see.

5. Add to Queue Button
– When clicked, starts the uploading of the file if there are no others being uploaded or adds it to the list of files that will be uploaded.

6. Remove from Queue Button
– Allows the user to remove any file that has finished uploading, is waiting to be uploaded, or is in the process of being uploaded from the queue.

7. Start/Pause Button
– Allows the user to start/pause any files at any time that are currently being uploaded to the File Organizer. Only one file may be uploaded at a time.


Adding a File to the Queue

1. Select a file from the file browser.

2. Select a client (optional).

3. Enter a new title (optional).

4. Enter a comment (optional).

5. Click the Add to Queue button.

Please Note:
1. All files will be uploaded to the user’s own My Files folder if a client is not selected.
2. Users may need to unblock pop-ups and click Run on windows that open. This depends on which browser and which security settings are being used.
3. Users should not close the Electronic Uploader window while there are active uploads. If closed, this will stop the upload process. However uploading will resume if once the window is reopened.
4. If a wrong file is selected and needs to be removed, users can click on the file in the upload queue and then click the Remove from the Queue button.


Adding a Role to a User

At any point in time, an Admin or a Group System Admin has the option of adding another role to an existing user.
Doing this will allow users access to new information and gain permissions that they did not have before.

Admins have the ability to add roles to Admins, Group System Admins, Group Admins, and Users.
Group System Admins can add roles to Group System Admins, Group Admins, and Users.

12

— To add a role to a user, an Admin or a Group System Admin must access their System Admin.
– After finding the user they’d like to edit, they can click on the pencil icon in the last column associated to that profile.
– Once the “Edit User” window has opened, they can go to the section listed as Role(s). Using the drop-down menu next to their current role will give options of adding another role to that user.
– The Admin or Group System Admin can then choose which one(s) they would like to add.

Note:
Gold Standard Raters, Scorers, Login Clients, and Clients cannot have more than one role.


By adding a new role for a user, they will now have to have two (or more) Group Associations.

– The Admin or Group System Admin must go to the second tab of the “Edit User” window and associate their user with a specific level depending on their new role.
— To switch from one role’s Group Associations to another within the same user, the Admin or Group System Admin can go to the upper right hand corner of the tab and click on the drop-down menu next to the word “Role”. An image has been provided below to show its locality.
— The drop-down menu will have a list of the roles that the user now has. Selecting one will show the Group Associations of that role.
— Following the How to Add a User article’s instructions regarding required Group Associations, the Admin or Group System Admin will add the new association for the new role of the existing user.

15

Note:
Adding new Group Associations to the new role will not affect the other role or their Group Associations.