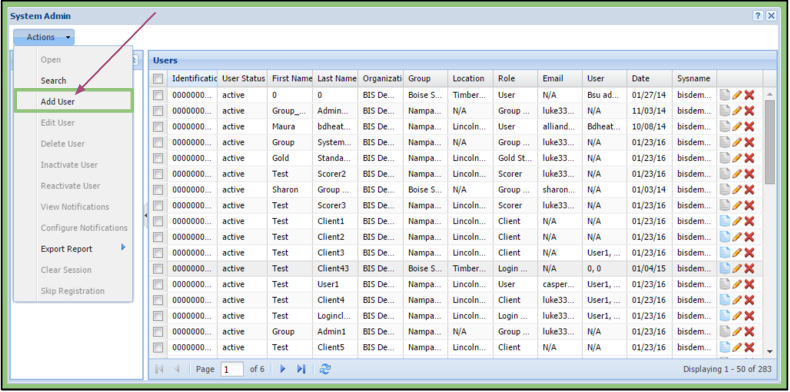
Video Player’s Tag Feature
A tag can be added to video files only and are placed at specific time points in the video. Previously added tags are not editable. When changes have been made to the file, the “Save” button at the bottom right will turn green. A tack will appear at the specified time in order to provide easy access to the tagged point. All tags are author and time-stamped.
Adding a Tag
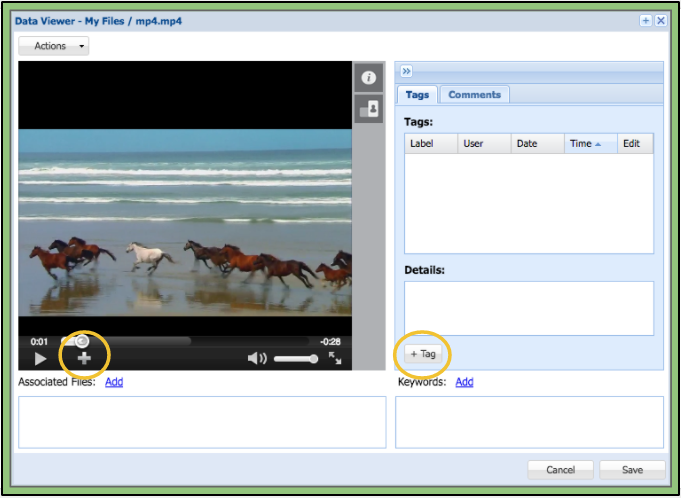
1. The user can click on the plus sign at the bottom left corner of the video player or on the “+ Tag” button to the right of the player.
2. This will open the tag window where the user selects a previously used tag or creates a new tag to add if permission is given.
Adding-a-Tag Window
After clicking one of the options to add a tag the Adding a Tag window will pop up.
1. The user can click on an existing tag or create a new tag of their choice if permitted.
2. The user can fill in optional information in the Details field.
3. They can then click the submit button.
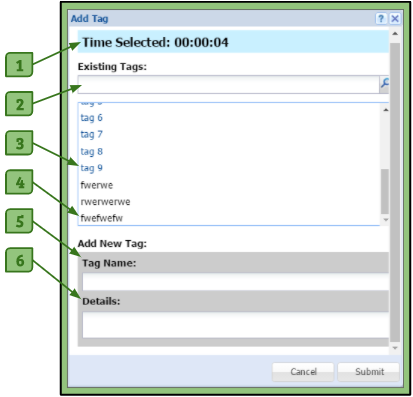
1. Time Selected
– This shows the user what time the video is at and where the tag will be placed in the video.
2. Existing Tags Search
– If a user wants to use an Organizational tag or a pre-existing tag, the user can type in the name of the tag to find them.
3. “Blue” Organizational Tags
– The tags that are in blue are the organizational tags. These are the tags that are set for use by default and are available to all users with access to the Video Player.
4. Regular Tags
– Tags that are in black are tags that have been previously used by the user themselves.
5. Tag Name
– If a user has permissions to add their own tag, they can put in a name here that will add a tag to the video as well as the Existing Tags list for next time.
6. Details Section
– A user can add any comments or details they deem important for themselves or others who have access to view their tags.
Video Player’s Tag Section
In order to add a tag, a user must go to the Video Player of the video they want to add a tag to. On the right is a section dedicated to the tags within the video.

1. Date Column
– This is the date that the tag was added by the author.
2. User Column
– This is the name of the author of the tag. Hovering over the name of the author will provide the full name.
3. Label Column
– This is the name of the tag. Organizational tags will show up as blue and others as black. Hovering over the name of the label will provide the full name.
5. Time Column
– This is the point in time of the video that the tag appears.
5. Arrow Button
– Appears next to the column that the tags are sorted by. While hovering over a column’s title, another arrow will appear allowing you to sort by ascending or descending alphabetically.
6. Edit Column
– Provides options to either delete or edit a tag. Only tags that have been made during this session can be edited or deleted. Previous tags on the video file cannot be edited or deleted (gray tacks) All newly added tags (green tacks) can be dragged to the correct time and/or edited..
+ Pencil Icon: Clicking on this icon will open the “Edit Tag” window, where the user can edit the tag name and/or the details of the tag.
+ “X” Icon: Clicking on this icon will delete the tag.
7. Details Section
– This text box provides the comments on the tag selected that were written by the author of the tag at the time it was created.
8. “+ Tag” Button
– This button allows the user to add a new tag to the file.
Please note:
To remove all tags from the video file, go to the Copy File article.