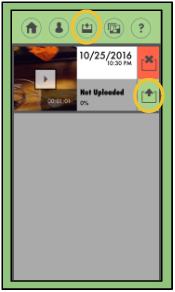
Posts

How to Set a Buffer Length on Your Video

Buffer-Length allows you to set a certain time-length in which the video will start recording before pressing the record button.
This allows you to capture moments leading up to a child’s reaction to a certain event.

Screen Shot 2017-04-23 at 10.52.51 PM1. On the Recording Screen will be the set time of “1 min” for the buffer-length.
2. Tap on the “1 min” button and a menu will pop up showing the options of zero minutes, one minute, three minutes, and five minutes.
3. Tap on the option you would like:
Three minutes will record the three minutes before you hit the record button.
4. You will see a bar start moving forward, showing that the buffer-length has been set and is recording.
5. Once the buffer-length has finished recording the minutes you chose to capture, it will turn green.

When you press play, your video will continue from the set amount of minutes of the buffer-length.

Electronic Uploader

The Electronic Uploader is where a user can upload files that are on their computer to the site. The files can be placed in the user’s own My Files folder or a client’s My Files folder.

12313


1. File/Browse Button
– When clicked, it accesses the files on the user’s computer in order add one to their File Organizer.

2. Client Drop-Down Menu
– Allows the user to choose the destination of the file they are uploading.

3. Title Field
– Allows the user to add a title to their file other than what it is named on the computer.

4. Comment Field
– Allows the user to add any notes they’d like other users who can access their file to see.

5. Add to Queue Button
– When clicked, starts the uploading of the file if there are no others being uploaded or adds it to the list of files that will be uploaded.

6. Remove from Queue Button
– Allows the user to remove any file that has finished uploading, is waiting to be uploaded, or is in the process of being uploaded from the queue.

7. Start/Pause Button
– Allows the user to start/pause any files at any time that are currently being uploaded to the File Organizer. Only one file may be uploaded at a time.


Adding a File to the Queue

1. Select a file from the file browser.

2. Select a client (optional).

3. Enter a new title (optional).

4. Enter a comment (optional).

5. Click the Add to Queue button.

Please Note:
1. All files will be uploaded to the user’s own My Files folder if a client is not selected.
2. Users may need to unblock pop-ups and click Run on windows that open. This depends on which browser and which security settings are being used.
3. Users should not close the Electronic Uploader window while there are active uploads. If closed, this will stop the upload process. However uploading will resume if once the window is reopened.
4. If a wrong file is selected and needs to be removed, users can click on the file in the upload queue and then click the Remove from the Queue button.