SmartCapture™: Selection Screen

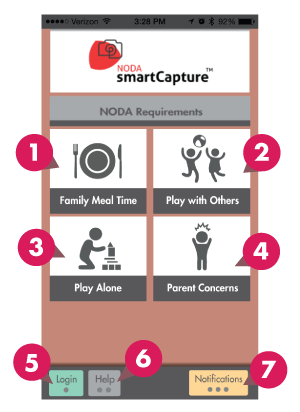
The NODA SmartCapture™ “Selection Screen” shows you the categories that need to be recorded as well as your notifications.

NODA smartCapture™ Home Screen annotated.

NODA smartCapture ™ home screen.

Key:

  1. Family Mealtime – This is the first of the four categories which will need to have a video recorded of a family mealtime. Tap it to be brought to the recording screen. For specific instructions on how and what to record, please go here.
  2. Play with Others – This is the second of the four categories which will need to have a video recorded of your child playing with others. Tap it to be brought to the recording screen. For specific instructions on how and what to record, please go here.
  3. Play Alone – This is the third of the four categories which will need to have a video recorded of your child playing alone. Tap it to be brought to the recording screen. For specific instructions on how and what to record, please go here.
  4. Parent Concerns – This is the fourth of the four categories which will need to have a video recorded of anything you find concerning. Tap it to be brought to the recording screen. For specific instructions on how and what to record, please go here.
  5. Login – Tap this button to open up the login window where you will type in your username and password. You can also tap “Register” in the login window to create your own username and password.
  6. Help – Tap this button to open up the help section of NODA SmartCapture™. It will give you a list of frequently asked questions as well as a quick start-up guide video to help you.
  7. Notifications – Tap this button to go to the “Notifications” screen where you will be able to view a list of comments from your clinicians.

Parent Concerns Category

“Parent Concerns”  is one of the four categories that need to be recorded in order for a clinician to diagnose your child.


How to Record a “Parent Concerns” Video

– Record any time/activity that results in behavior that is of primary concern for you and that you would like to share with the clinician.
– Set up the camera ahead of time.
– In the first minute of recording please say out loud what you would like the clinician to see (“This is Johnny ignoring me;” or “This change causes a really bad temper tantrum”).
– Make sure the child being recorded is in view of the camera. If necessary move the camera around but try not to be obviously filming the child.

Play Alone Category

“Play Alone”  is one of the four categories that need to be recorded in order for a clinician to diagnose your child.


How to Record a “Play Alone” Video

– Record your child playing with toys/fun items (NO ELECTRONICS).
– Set up 5-10 toys.
– Mount the camera ahead of time and make sure the child/toys are in view and the child is facing the camera.
– Play with him briefly to get the play started (call his name; point to something saying “Look at that;” ask him where something is in the room, “Where’s the dog?”; try to get him to smile without touching).
– After each interaction, wait and see what he does. After a few minutes of interaction, let him play alone.

Play with Others Category

“Play with Others”  is one of the four categories that need to be recorded in order for a clinician to diagnose your child.


How to Record a “Play with Others” Video

– Record your child playing with a sibling (or with you if no siblings).
– Set up five fun items (toys/books/NO ELECTRONICS).
– Mount camera so both play partners and the toys are in view and the child is facing camera.
– Briefly interact with the child (say his name; direct his attention to sibling; offer a toy- hold it out but don’t give it to him) and then wait for his reaction.
– After a few minutes let the children play. If no sibling, play with the child but let him guide the play.

Family Meal Time Category

“Family Meal Time” is one of the four categories that need to be recorded in order for a clinician to diagnose your child.


How to Record a “Family Meal Time” Video

– Record any family meal time.
– Mount the camera ahead of time.
– Make sure everyone is in the frame and the child is facing the camera.
– Interact with each other like you normally do.
– Interact with the child at least four times (say his name; offer food/drink; ask him to look at something and point to it; look at him and smile, see if he smiles back).
– Other family members should also interact with the child, but do not overdo it (if the child starts to talk/interact, let him guide the interaction).

How to Completely Reset an App

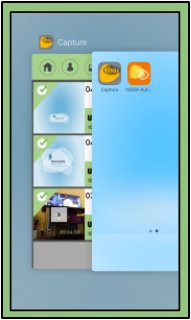
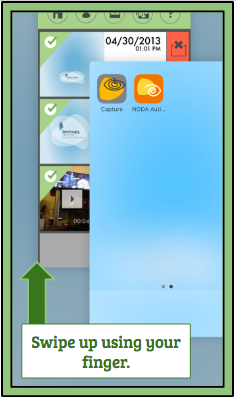
If for some reason at any time while using Behavior Capture™ and you need to reset it, follow the steps listed:


Screen Shot 2017-04-13 at 4.16.22 PMScreen Shot 2017-04-13 at 4.36.42 PM1. Exit out of the app to the home screen by pressing the Home button (the button on the bottom of the phone).

2. Tap the Home button twice and it will bring you to the menu shown on the far left.

3. Using your finger, press on the app and swipe up, dragging it out of view.

4. Press the Home button again to get back to the main screen.

My Video Won’t Stop Recording

Symptoms –

You open NODA™ and tap on one of the categories. You press “REC” and the video starts recording. When you are ready to stop recording, you can’t find a button to stop the video and the video won’t stop itself.

What’s Wrong –

When you first the NODA™ application, a pop-up box will come up, saying that NODA™ would like to access your microphone.

In order for NODA™ to be able to record your videos correctly, the application needs to access the microphone. If you said no, you may run into a problem where the video is not able to stop recording. If NODA™ is working correctly, there should be a red “STOP” button in place of the “REC” button. If your “REC” button turns a light red when recording, still says “REC,” and will not stop recording when pressed, this means NODA™ has no accessibility to your microphone.

How to Fix This Problem –

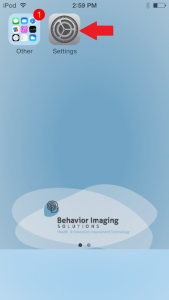
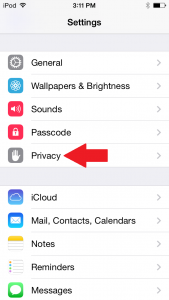
  • From your main menu, go to the “Settings” app for your Apple product.

IMG_0018

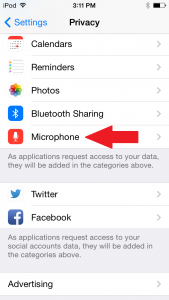
  • Scroll down until you see the word “Privacy.” Tap on it.

IMG_0032

  • Scroll down until you see the word “Microphone.” Tap on this.

IMG_0033

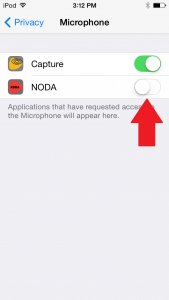
  • Scroll down the list of applications until you see NODA™.
  • Button across from it will be gray.

IMG_0034

  • Tap on the button, making it green.
  • Exit out of your “Settings.”
  • Go to the NODA™ application.
  • Try recording a video.
  • “REC” button should now turn to a “STOP” button.