NODA’s Video Recording

The NODA app gives the user ability to record video and audio within the application.

Videos can be paused and then restarted for recording.

Video will automatically stop recording at 10 minutes (the video length limit).


For step by step instructions on how to record a video in NODA, please visit our NODA’s How To’s section.

NODA Frequently Asked Questions

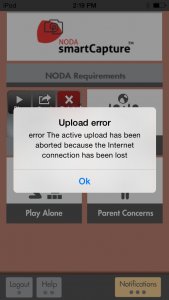
Q:  I’m having trouble uploading with my mobile device. It keeps erroring out. What should I do?

A: This could be because of numerous reasons. Make sure your device is connected to a stable internet and that it has enough open storage. Do not navigate away from the app while you are uploading.

If you are trying to upload from a third party service like Google Drive, Dropbox, etc., try downloading the video file to your device’s library first. Then try uploading the file from the library on the NODA app.

If you are having too much trouble on your mobile device try moving your video file to the computer and uploading it to NODA.behaviorimaging.com .

Our support team at email, noda@behaviorimaging.com, will be happy to walk you through these steps and investigate any issue you have. Make sure you email them as much information as you can so they can solve your issue efficiently such as:

  • What type of device you have
  • What is happening and what error message (if any) is showing
  • What method of uploading are you using? Are you using a third part app or are you uploading straight from the library?

Q:  Can I use the same email for multiple accounts?

A: No, an email can only be connected to one NODA account.


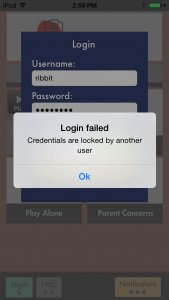
Q: I can’t log in. It says “Credentials are locked by another user”

A: The system doesn’t allow two users to use the same login at once. This will also happen when someone doesn’t manually log out and closes the window. Wait 10 minutes for the system to log you out automatically and you will be able to log back in.


Q: Why does it takes a long time to upload a video in the app?

A: When uploading videos the file size and network speed determine how fast your upload will be.

NOTE: To see how fast your upload should take here is a great reference site:

http://www.meridianoutpost.com/resources/etools/calculators/calculator-file-download-time.php


Q: I have a fast download speed why does it take so long to upload a video?

A: Download and uploading are different, when you perform a speed test on your network they will give you a download speed and an upload speed.

Downloading is how fast you pull information from a server to your local device.

Uploading is how fast you put information from your local device to a server.


Q: How long of a video should I upload?

A: Depends on the situation, as long as you feel it captures the behavior and is under 10 min in length

(Note: you can only upload 1 video per section except for the parents concerns section. In the parents concerns section you can upload up to 4 videos but the total length of videos has to be 10 minutes or under)


Q: After I uploaded a video there is a red ! in that section. What does that mean?

A: Either your video is over 10 minutes or there was an error in your upload. If you click on the section it will give more information on the error.


Q: What is the Organization Code that is requested when I register for NODA?

A: The Organization Code is a specific case-sensitive code that links your account to a specific clinic for a diagnosis. If you don’t have an Organization code please fill out the forum to find what clinics are available in your area here: https://www.nodaautismdiagnosis.com/contact-us


Q: Do I have to record my videos in the NODA application?

A: No,  You don’t need to use NODA to record the videos, as long as the video is in your device library NODA can upload it.

 

NODA: Submitting Videos to Clinicians

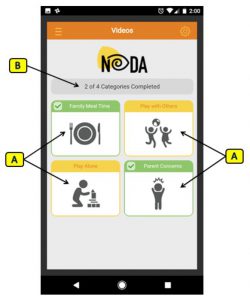
NODA Interface

A. Upload Sections: Where videos are uploaded for clinicians to see.

Green: Shows that a file has been uploaded in a certain section.
Yellow: Shows no file has been uploaded in that peculiar section yet.

  • Family Meal Time
  • Play with Others
  • Play Alone
  • Parent Concerns

B. Progress: Shows how many sections have been completed. Example: (2 of 4)


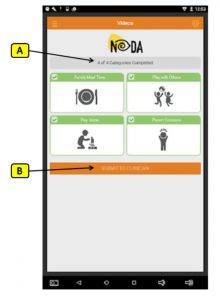
NODA Submitting Videos

A. Progress: Shows how many sections have been completed.  Example: (4 of 4)

B. Submit: Sends videos to user’s clinician.

Note:
– Submit button won’t appear until all sections are completed (4 of 4)
– Once videos are submitted, the user can’t upload more files or delete files from the sections.


Logging into the NODA App

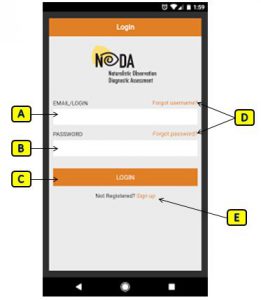
Login Screen

This is the first screen that will be displayed after launching the NODA application on your mobile device.

A. Email/Login: This is a text field the user will put in there email used for login ID.

B. Password: This is a text field the user will put the password to login into the application.

C. Login: Button when pressed will check Email and Password and then login into NODA if information is correct.

D. Forgot Username/Password: Will take user through process to retrieve username or password.

E. Sign up: Will take user through process of setting up account with the NODA application.


Home Screen

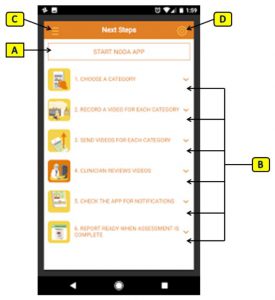
Once logged in, you will be taken to the Home screen.

A. Start NODA APP: This is a button once pressed will take user into app where they can record and upload videos for clinicians

B. User Guide: When any section is selected will provide a drop down of information for the user to better understand the process of the NODA application.

C. Menu: Menu to navigate to different section of the application

  • Home: This is the screen you see to the right
  • Notifications: These are message/notification user receive from clinicians
  • NODA App: Where videos are record and uploaded to clinicians
  • Report: Clinicians report that are sent to user
  • Sign OFF: Signs out of application

D. Settings: options to change user information

  • Email/Login
  • Password
  • Phone Number

NODA: Uploading Files

NODA’s Upload Section

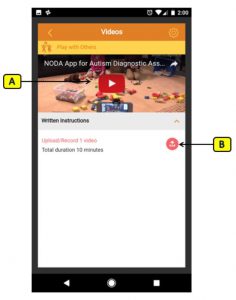
A screen displayed after selecting one of the four sections:

  • Family Meal Time
  • Play with Others
  • Play Alone
  • Parent Concerns

A. Tutorial Video: Video to help educate users on how to upload/record video

B. Upload Button: Once pressed, the user can select a file to upload.

Options on uploading:

  • From Library
  • Recording new video to be uploaded

Note: Only supports videos up to 10 minutes in length


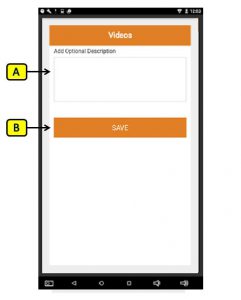
Video (Optional) Description

After selecting a file to upload the application will bring you to this page.

A. Video Description Text Box: This is optional. User can type in information they can provide to the clinician regarding the video.

B. SAVE Button: Saves the text.

Note: The “SAVE” button will have to be pressed to continue, even if there were no changes made.


After Video is uploaded

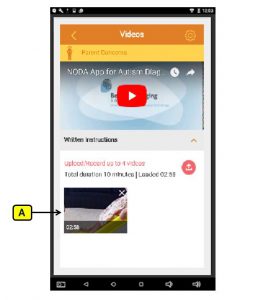
After video is uploaded to section, the section will display thumbnail of video uploaded.

A. Video Thumbnail: After video is uploaded, it will display a thumbnail of the video and the duration of the video.


Review Uploaded Video


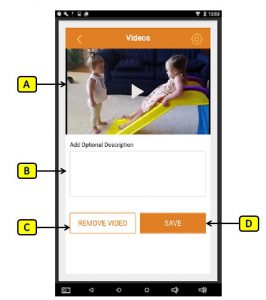
If thumbnail is selected after uploaded, this page will display to user:

A.  Replay: Plays the video that was uploaded.

B. Video Description Text Box: Can edit or add new text description.

C.  Remove Video Button: Removes the video.

D. SAVE Button: Save changes.

Note: “SAVE” button will have to be pressed to continue, even if there were no changes made.

Helping At-risk Families in Rural Idaho, Eastern Washington

The University of Idaho Child & Youth Study Center has been collaborating with other autism health professionals on Behavior Imaging’s National Institute of Health (NIH) research grant to explore alternative methods of diagnosing autism spectrum disorder earlier, especially for children in underserved and rural areas.

The Center will still accept participants into this program from outlying areas (remote to Moscow) who may be suspect of having autism until May 31st, 2016. Participants must be between the ages of 1 and 7. If you can share this opportunity with your network especially in surrounding rural communities who would like further information and potentially participate in this research initiative, they can contact Dr. Gwen Mitchell at gmitchell@uidaho.edu , 208-885-6191

As part of this study, the University’s clinic will provide comprehensive diagnostic assessment to
participants at no charge if they choose to complete the two stages of this process.
1) a comprehensive evaluation at the University clinic in Moscow and
2) complete the Naturalistic Observation Diagnostic Assessment protocol from their homes (which will be discussed in depth when interested families contact the clinic). Nominal financial compensation is given to the family after they complete each phase.

This will be an excellent opportunity for parents of children who have no or limited insurance coverage or who are on Washington Medicaid. Please contact Gwen Mitchell if you would like to discuss NODA and this study. We are excited to work with the NIH and our other partners nationwide in developing a tool that may revolutionize the way we make diagnostic determinations.


Sincerely,
Ron Oberleitner, Principal Investigator – NIH Study – ‘Accelerating the diagnosis of autism spectrum disorder in rural Idaho via evidence-based Smartphone technology’ –

I Can’t Delete My Video

Symptoms –

You recorded a video a few days ago and are hoping to record another in the same category. You try deleting your video, where a pop-up box comes up, asking you if you’re sure, and you click “Yes”. Your video does not get deleted though, it’s still there.

What’s Wrong –

In order for SmartCapture™ to delete a video, you must have an internet connection.

How to Fix this Problem –

Make sure that your Wi-Fi is turned on by going to “Settings”, then “Wi-Fi” and turning the grey button to green. If your button is already green, then that means you are not near a Wi-Fi hotspot. Go to a different place in your house that is closer to your router.

I Can’t Log in to SmartCapture™

IMG_0039

Symptoms –

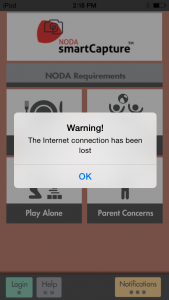
You open SmartCapture™ and record a video. You want to send your video, so you hit “Login” and enter your username and password. You tap “Login”, but an error like this one pops up.

What’s Wrong –

Someone else is logged into your name, most likely an administrator.

How to Fix this Problem –

The first thing you should do is wait ten minutes to an hour to see if the user using your credentials logs out. If you still cannot login to SmartCapture™, it is best to contact your administrator and tell them that you cannot login so that they can reset your username and password.

The Video I Uploaded is No Longer There

Symptoms –

You recorded a video in a category and uploaded it to NODA: Connect™. A few days later, you open the app and notice there is an empty spot in the category where your video was.

What’s Wrong –

If your video is no longer there, this means that your clinician has viewed your video and has sent you a comment and is requesting more evidence for that category.

How to Fix this Problem –

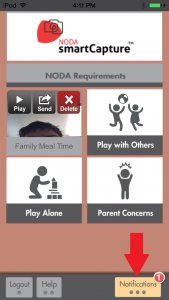
IMG_0037Checking your notifications will allow you to see the comments that your clinician has left for you. The notifications tab is located at the bottom right corner of your app.


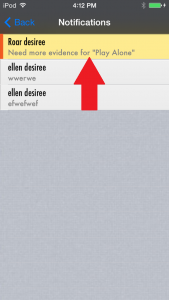
IMG_0038Once you click this, you will be brought to the notification screen where you’ll have a list of comments from your clinician. Unread comments will be in yellow:

Follow the instructions that your clinician has given you and record and send another video.

I’m Having Trouble Connecting to the Internet

Symptoms –

While trying to upload videos on SmartCapture™, you’re having trouble sending them because you have received an error message that looks like one of these:

IMG_0035IMG_0036

What’s Wrong –

Your internet connection is suffering. In order to send videos to NODA Connect™, you need to have a good internet connection. Depending on the length of your video, it can take several minutes for your video to upload, and a good connection to ensure that it goes through.

How to Fix this Problem –

Your best option is to try and improve your internet connection. Here are some ways you can do this:

  • Go into “Settings” of your iTouch, then “Wi-Fi”, and turn your Wi-Fi off. Wait about 30 seconds, and turn it back on.
  • Set your iTouch close to your router.
  • Change which internet connection you are using.
  • Exit the app, press the “Home” button, and delete the app from those that are running. Next, turn off your iTouch. Unplug the power chord to your router. Wait five minutes, then turn everything back on.