Setting Up to Receive Notifications

Notifications are an easy way for a user to stay on top of changes to their clients. If a user has access to a client, they can set up to receive specific notifications for them.  Administrative roles can also be notified of changes to all user roles available in the System Admin window. There is more information about the specifics of the Notification Settings page.

1


4Setting Notifications Using the Client Selector (User Roles)

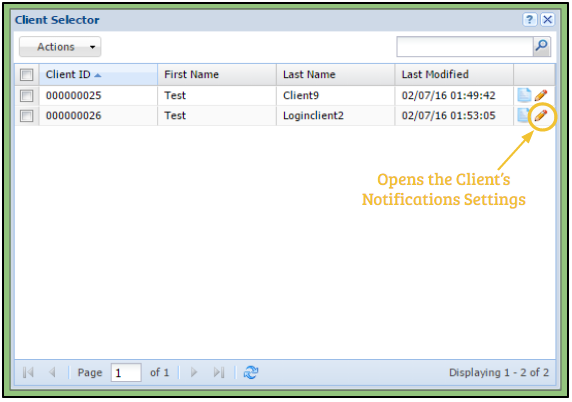
1. The user opens the Client Selector.
2. Clicking the pencil icon next to the desired client will open their Notification Settings.
3. The user can then check the checkboxes next to the options they want to be notified of.
4. Pressing save will save the changes and the user will then:
A. Receive an email whenever one of the changes selected occur.
B. Have their notifications tab turn red whenever one of the changes selected occur.


5Setting Notifications Using the System Admin Window (Administrative Roles)

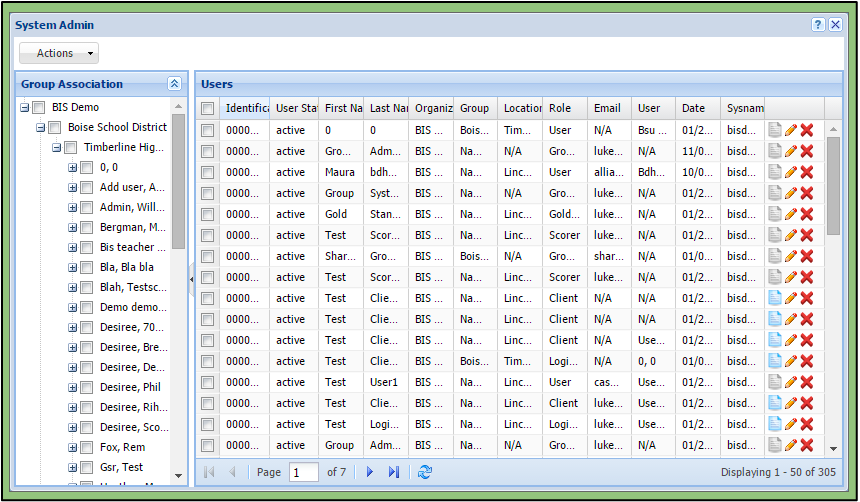
1. The user opens the System Admin window.
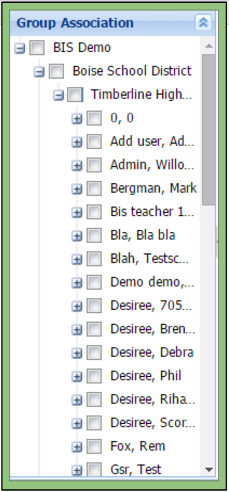
2. They then can check the checkbox next to the desired user or client.
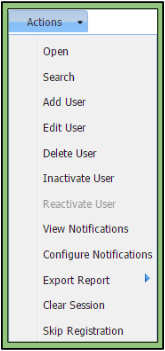
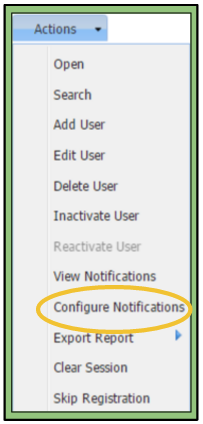
3. Going to the Actions tab in the upper left-hand corner and clicking “Configure Notifications” will open their Notification Settings.
4. The user can then check the checkboxes next to the options they wish to be notified of.
5. Pressing save will save the changes and the user will then:
A. Receive an email whenever one of the changes selected occur.
B. Have their notifications tab turn red whenever one of the changes selected occur.

Notification Settings

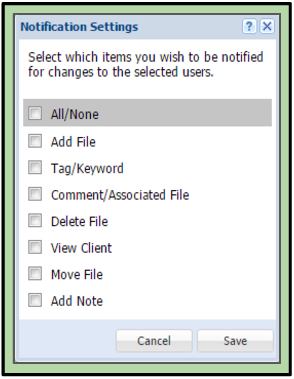
The Notification Settings window pops up after clicking on the actions tab of the System Admin (available for Admins, Group System Admins, and Group Admins)  or the actions tab in the Client Selector (available for Users, Scorers, and Gold Standard Raters). This window allows the Admin the ability to configure what notifications they will receive per user/client.


Prefigured Notifications

When a new user/client is added to the system, they are prefigured with the notifications of the following:
– Add File
– Add Tag/Keyword
– Add Comment/Associated File
– Add Note
This is the case for all users except the Admin themselves. The Admin must configure all notifications for the users for which options they want notifications for.


Available Notification Settings

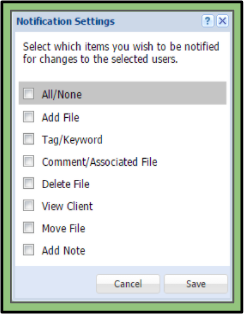
Screen Shot 2017-03-08 at 9.01.40 PM

1. All/None
2. Add File
3. Tag/Keyword
4. Comment/Associated file
5. Delete File
6. View Client
7. Move File
8. Add Note

Check the boxes for which actions each individual user wants to be notified of. An email will be sent to the user notifying them that an action has occurred as well as turning the Notifications button red on the main toolbar on the site.

Data Viewers

All files within the system will appear in a Data Viewer when opened. Metadata and communication can be annotated within the Data Viewer. A user will be able to add, edit, and delete all metadata only until the user clicks the Save button.

There are two types of Data Viewers, each meant for different types of data:

  1. Video Player
  2. PDF & Image Viewer

Video Player

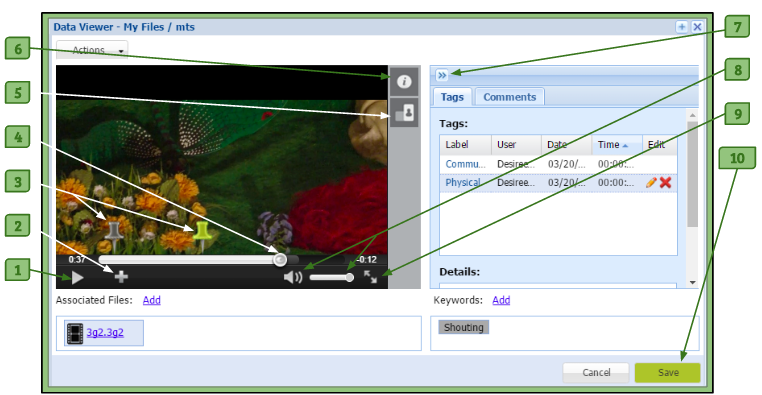
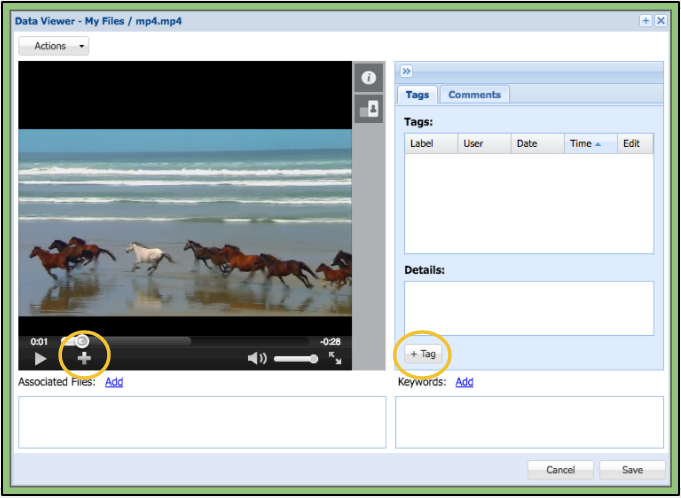
The video player is the data viewer made specifically for videos. The video player has the feature of adding tags to specific points in the recording that are important and notable.

4321


1. Play/Pause
– This arrow will cause the video to start playing or pause the video if it is already playing.

2. Add Tag
– For more information about how to add a tag, please click here.

3. Tag Tacks
– These tacks mark the points at which there are tags. A green tack means it is one that has not been saved while the gray tacks mean they cannot be removed.

4. Time Scrubber
– Allows the user to drag the scrubber to any point within the video.

5. Rotate Viewer
– This icon allows the user to switch the orientation and/or direction of the video.

6. File Information
– Clicking on this icon will open up a window with the following information on the file:
+ Folder Location
+ Recorded On
+ Uploaded By
+ Last Update
+ File Size

7. Collapsible Tab
– These arrows allow the user to collapse the Tag and Comment section to offer more space if needed.

8. Adjust Sound
– By clicking on the soundbar, the user can drag it to adjust the sound. The user can also click on the speaker icon to completely mute the sound, and then click again to put it back to the loudness it was previously.

9. Full Screen
– Clicking on the diagonal arrows allows the user to enlarge the video into full screen. Pressing the “Esc” button on your keyboard or clicking on this button again will bring back the original video player.

10. Save Button
– The save button will turn green when there are changes that have been made and can be saved.


PDF & Image Viewer

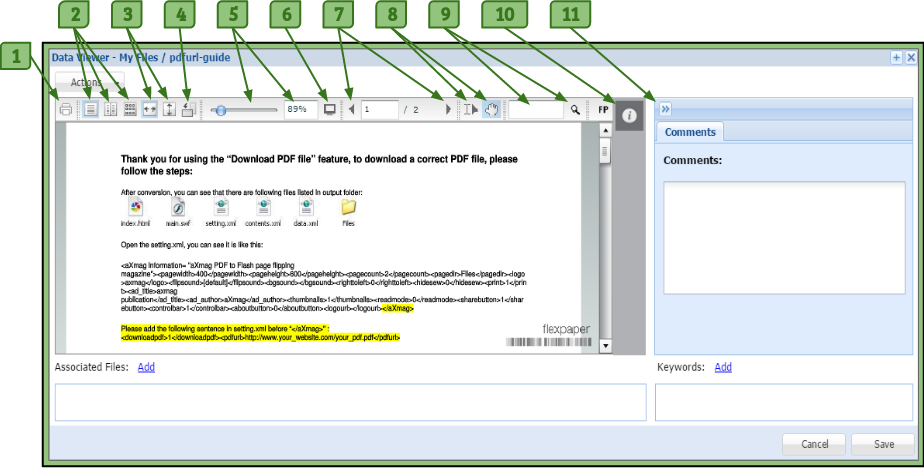
The Image Viewer allows the user to view images as well as PDFs and other types of documents. The image viewer however does not have the tags feature, but has options for viewing the documents more efficiently.

1212


1. Print
– Clicking on this icon brings up a new window with different options for printing the file.

2. Page View Options
– Allows the user to view the file either by one page, two pages, or all pages at a time.

3. Fit Width/Page
– Fits the file to the size of the width or length of the viewer.

4. Rotate Current Page
– This icon allows the user to switch the orientation and/or direction of the current page.

5. Scale Bar/Box
– Allows the user to drag the bar or write in a percentage to zoom in or out on the file.

6. Full Screen
– Clicking on the diagonal arrows allows the user to enlarge the video into full screen. Pressing the “Esc” button or clicking on this button again will bring back the original video player.

7. Previous/Next Page
– Allows the user to go back to the previous page or forward to the next page of the file.

8. Mouse Tools
– These two buttons allow the user to change the style of their mouse arrow.

9. Search Field
– Allows the user to search the file for keywords within the file itself.

10. File Information
– Clicking on this icon will open up a window with the following information on the file:
+ Folder Location
+ Recorded On
+ Uploaded By
+ Last Update
+ File Size

11. Collapsible Tab
– These arrows allow the user to collapse the Comment section to ffer more space if needed. For more information regarding Comments, please click here.


Comments Feature

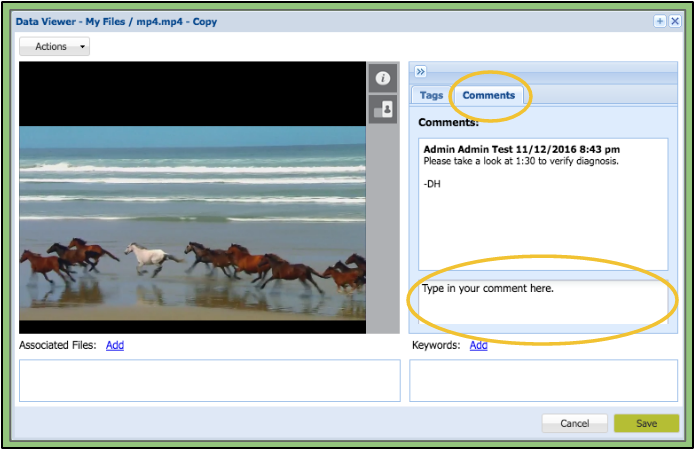
Comments can be added to any file available for a user with permissions. All comments will be author and timestamped.


Adding a Comment

1. The user clicks on the Comment Tab in the file viewer.
2. This will open the Comment section.
– Previous comments will be in the top window.
3. Below is a text field for the user to add a new comment.
4. To save a comment the user must click the Save button on the bottom of the file viewer.
– All previous comments are not editable.

Please note:
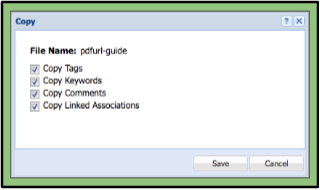
To remove all comments from the file see the Copy File article.

Screen Shot 2016-11-12 at 8.51.27 PM


Screen Shot 2016-08-28 at 10.34.55 PM

Deleting a Comment

When creating a copy of the file, the user will have an opportunity to remove all comments on the file.

Client Notepad Feature

The Client Notepad allows users with permissions to create and view notes regarding a client.

All users and admins associated with this client will have access to these notes.
Login Clients are capable of viewing notes that a user makes available to them.


Client Notepad’s Location

The Client Notepad can be found in the System Admin feature for Admins, Group System Admins, and Group Admins.
– After opening the System Admin, to the right in the columns of each user is a notepad which can be accessed.

Users can find the Client Notepad in the Client Selector.
– Each client will have a notepad icon in their column.
Login Clients can access their Client Notepad through their Notifications tab.


Adding a Note

1. The user clicks on a client’s notepad.
2. They then type a note in the top text field.
3. The user chooses if the note is intended for the client to read.
– If so, the user clicks on the Client Readable checkbox.
4. The user reviews their note and clicks on the Post button.


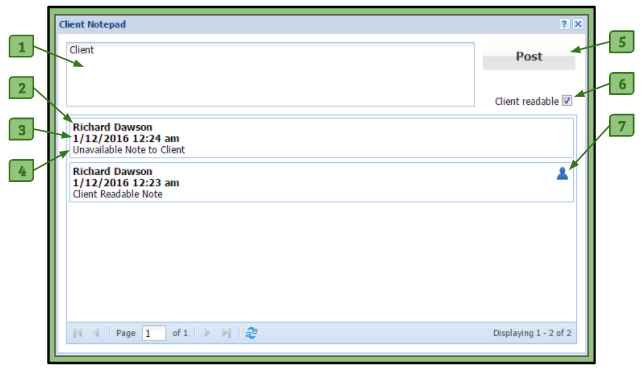
Client Notepad Diagram

54343

1. Text Box
– The user writes in the note to be recorded here.

2. User’s Name
– The first line on the recorded note is the name of the user that authored it.

3. Date/Time Stamp
– This stamp shows when the user created the note.

4. Note
– This is the text of the note that has been submitted by the user.

5. Post Button
– By pressing this button it will submit the text to the left as a note.

6. Client Readable Checkbox
– By checking this box, it allows a login client to view the note the user is posting. A pop-up window will occur when this box is selected reminding the user that the client will be able to view the note.
Please note: Clients that are not login clients will not have this option available on their notepad.

7. Head Symbol
– This symbol marks the notes that can be viewed by the login client.

Video Player’s Tag Feature

A tag can be added to video files only and are placed at specific time points in the video. Previously added tags are not editable. When changes have been made to the file, the “Save” button at the bottom right will turn green. A tack will appear at the specified time in order to provide easy access to the tagged point. All tags are author and time-stamped.


Adding a Tag

 1. The user can click on the plus sign at the bottom left corner of the video player or on the “+ Tag” button to the right of the player.
2. This will open the tag window where the user selects a previously used tag or creates a new tag to add if permission is given.

Screen Shot 2016-11-12 at 9.10.59 PM


Adding-a-Tag Window

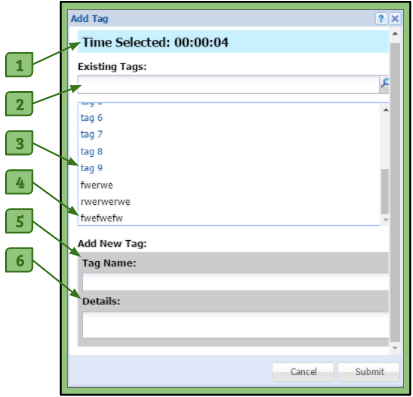
After clicking one of the options to add a tag the Adding a Tag window will pop up.

1. The user can click on an existing tag or create a new tag of their choice if permitted.
2. The user can fill in optional information in the Details field.
3. They can then click the submit button.

Screen Shot 2017-03-08 at 8.07.51 PM

1. Time Selected
– This shows the user what time the video is at and where the tag will be placed in the video.

2. Existing Tags Search
– If a user wants to use an Organizational tag or a pre-existing tag, the user can type in the name of the tag to find them.

3. “Blue” Organizational Tags
– The tags that are in blue are the organizational tags. These are the tags that are set for use by default and are available to all users with access to the Video Player.

4. Regular Tags
– Tags that are in black are tags that have been previously used by the user themselves.

5. Tag Name
– If a user has permissions to add their own tag, they can put in a name here that will add a tag to the video as well as the Existing Tags list for next time.

6. Details Section
– A user can add any comments or details they deem important for themselves or others who have access to view their tags.


Video Player’s Tag Section

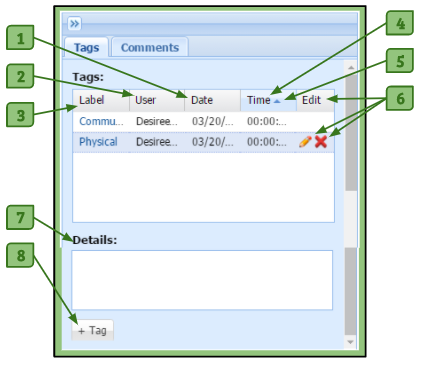
In order to add a tag, a user must go to the Video Player of the video they want to add a tag to. On the right is a section dedicated to the tags within the video.

Screen Shot 2017-03-08 at 8.53.53 PM

1. Date Column
– This is the date that the tag was added by the author.

2. User Column
– This is the name of the author of the tag. Hovering over the name of the author will provide the full name.

3. Label Column
– This is the name of the tag. Organizational tags will show up as blue and others as black. Hovering over the name of the label will provide the full name.

5. Time Column
– This is the point in time of the video that the tag appears.

5. Arrow Button
– Appears next to the column that the tags are sorted by. While hovering over a column’s title, another arrow will appear allowing you to sort by ascending or descending alphabetically.

6. Edit Column
– Provides options to either delete or edit a tag. Only tags that have been made during this session can be edited or deleted. Previous tags on the video file cannot be edited or deleted (gray tacks) All newly added tags (green tacks) can be dragged to the correct time and/or edited..
+ Pencil Icon: Clicking on this icon will open the “Edit Tag” window, where the user can edit the tag name and/or the details of the tag.
+ “X” Icon: Clicking on this icon will delete the tag.

7. Details Section
– This text box provides the comments on the tag selected that were written by the author of the tag at the time it was created.

8. “+ Tag” Button
– This button allows the user to add a new tag to the file.

Please note:
To remove all tags from the video file, go to the Copy File article.

Electronic Uploader

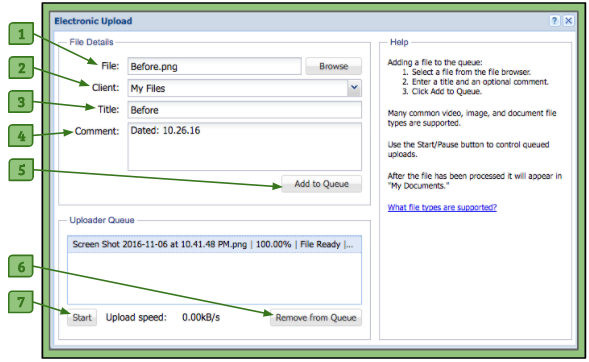
The Electronic Uploader is where a user can upload files that are on their computer to the site. The files can be placed in the user’s own My Files folder or a client’s My Files folder.

12313


1. File/Browse Button
– When clicked, it accesses the files on the user’s computer in order add one to their File Organizer.

2. Client Drop-Down Menu
– Allows the user to choose the destination of the file they are uploading.

3. Title Field
– Allows the user to add a title to their file other than what it is named on the computer.

4. Comment Field
– Allows the user to add any notes they’d like other users who can access their file to see.

5. Add to Queue Button
– When clicked, starts the uploading of the file if there are no others being uploaded or adds it to the list of files that will be uploaded.

6. Remove from Queue Button
– Allows the user to remove any file that has finished uploading, is waiting to be uploaded, or is in the process of being uploaded from the queue.

7. Start/Pause Button
– Allows the user to start/pause any files at any time that are currently being uploaded to the File Organizer. Only one file may be uploaded at a time.


Adding a File to the Queue

1. Select a file from the file browser.

2. Select a client (optional).

3. Enter a new title (optional).

4. Enter a comment (optional).

5. Click the Add to Queue button.

Please Note:
1. All files will be uploaded to the user’s own My Files folder if a client is not selected.
2. Users may need to unblock pop-ups and click Run on windows that open. This depends on which browser and which security settings are being used.
3. Users should not close the Electronic Uploader window while there are active uploads. If closed, this will stop the upload process. However uploading will resume if once the window is reopened.
4. If a wrong file is selected and needs to be removed, users can click on the file in the upload queue and then click the Remove from the Queue button.


Fax Uploader

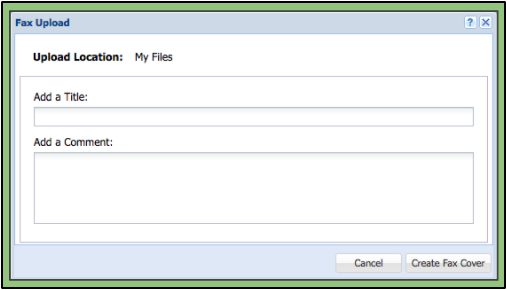
The Fax Uploader allows a user to create a coversheet in order to fax a document to the system and add it to their File Organizer.

Screen Shot 2016-11-06 at 11.55.33 PM

1. Within the fax upload window, there are two boxes in which to enter information:
Title Field: A place for the user to enter the name of the file.
Comment Field: A place for the user to add any notes they’d like other users who can access their file to see (optional).

2. After filling out the information, the user will click the Create Fax Cover button.

3. This brings up a created PDF file with the username of the user and the title and the comment previously filled out.

4. Clicking on the printer button on the menu bar will print out the fax upload form.

5. The user must follow the instructions printed on it to fax their complete document.

6. The file will be uploaded into the user’s My Files folder.

Please Note:
The user needs to include the fax coversheet with the document they are faxing.

How to Add a File to a Client

For all user roles including administrators, there are two ways to add a file to a client:

Directly Uploading to a Client’s Portfolio

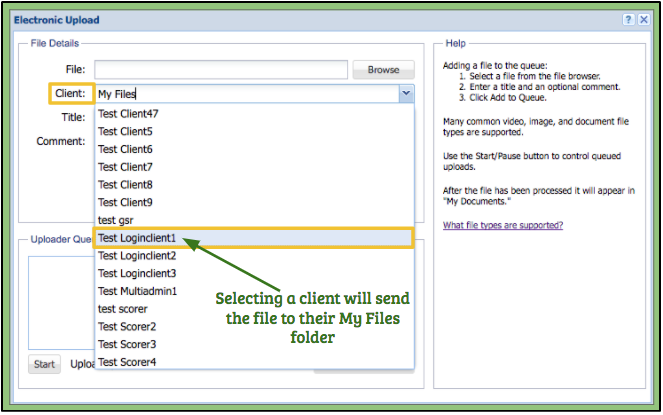
By putting in a client’s name in the Electronic Uploader, the uploaded file will be added to the client’s My Files folder. The user can find the client by using the arrow for the drop-down menu or by typing in the client’s name in the text field. For more information on how to use the Electronic Uploader, please click on the link.

Screen Shot 2017-01-02 at 2.39.23 AM


Transferring Files to a Client’s Portfolio

Administrator roles will use the System Admin Window while user roles will use the Client Selector.

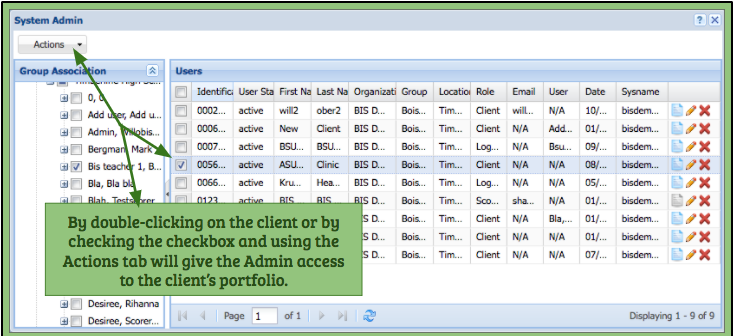
Administrator’s System Admin Window:

An admin may go to their System Admin Window and either double-click on the client or select the checkbox next to them and use the Actions tab. Both ways will open their portfolio.

Screen Shot 2017-01-02 at 3.13.16 AM

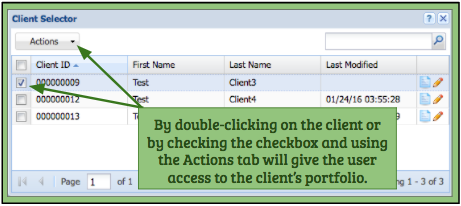
User’s Client Selector Window:

A user may go to their Client Selector and either double-click on the client or select the checkbox next to them and use the Actions tab. Both ways will open their portfolio.

Screen Shot 2017-02-26 at 7.11.39 PM

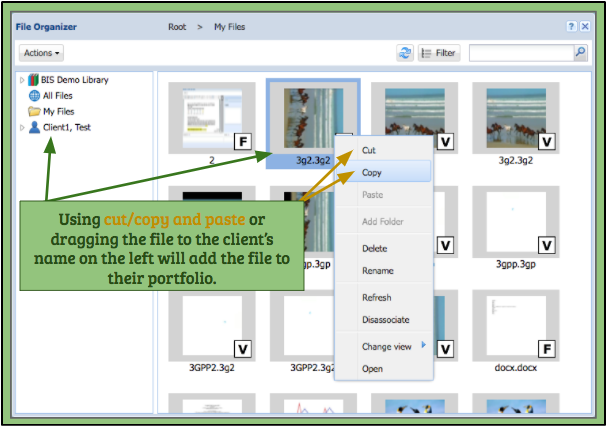
– Clicking on a client in either the Client Selector or the System Admin will allow the user access to the client’s portfolio in their File Organizer.
– The user can then go to their own My Files folder and find the file they want to give to their client.
– The user can then:
A. Right-click on the file and use copy/cut and paste it once inside the client’s portfolio.
B. Drag the file to the client’s name on the left. This will remove the file from the user’s My Files and add it to the client’s portfolio.
– Double-clicking on the client’s name on the left will open up their portfolio.
– For more information on the File Organizer, please click on the link.

Screen Shot 2017-01-02 at 3.46.15 AM

Giving Users Access to Clients (Admins Only)

Behavior Connect is a role and permission based system. Every user will need permission to access clients within the system.

Screen Shot 2016-09-25 at 10.23.26 PM

To give access for a client to a user, the Admin must first open the add/edit window for the client via the System Admin window.

1. Click on the Group Associations tab next to the Personal Details tab.
2. Select the user who needs access to the client from the lefthand column.
3. Move the user to the right-hand column, titled Selected Group.
– The Admin can do this by dragging and dropping or using the arrows.
4. Click the Save button.
The newly added user will now have access to the client’s portfolio. They can access the client from their Client Selector.