User Roles

There are three different types of user roles:

  • Basic User role
  • Scorer role
  • Gold Standard Rater role

 User

The User is the most common role used within the Enterprise Account. Users have access to the Clients that have been associated to them and can collaborate with other Users associated with the Client’s or Login Client’s portfolio. They can view all tags, keywords, comments, and associated files within the client’s account.
A User has access to the following tabs:

Actions:
1. File Organizer
– Library
– All Files
– My Files
2. Client Selector
Client Notepads
Upload:
1. Electronic
2. FAX
3. App
Settings:
1. Update Profile
Notifications:
1. Notifications
Help:
1. Support Query
2. KnowledgeBase


Scorer

The Scorer role is designed to have no access to other roles’ metadata (such as tags, keywords, comments). This role can be used for Inter-rater reliability as well as staff evaluation.

Please note: All added Organizational Tags by the Scorer is part of the Generic IRR Report.

Screen Shot 2017-03-08 at 10.20.10 PM

A Scorer has access to the following tabs:

Actions:
1. File Organizer
– Library
Please note: Scorers can only view videos, files, and print documents.
– All Files
Please note: Scorers cannot see other users’ metadata within a file. For example,
they cannot view other users’ tags, comments, or keywords.
– My Files
2. Client Selector
Upload:
1. Electronic
2. FAX
3. App
Settings:
1. Update Profile
Notifications:
1. Notifications
Help:
1. Support Query
2. KnowledgeBase


 Gold Standard Rater

The Gold Standard Rater is a role designed so that it has no access to other roles’ metadata (tags, keywords, comments). This role can be used for Inter-rater reliability, as well as staff evaluation. The Gold Standard Rater role is compared to the Scorer’s organizational tags on video files within the IRR report (only available to the Admin).

Please note: All added Organizational Tags by the Gold Standard Rater are part of the Generic IRR Report.

A Gold Standard Rater has access to the following tabs:

Actions:
1. File Organizer
– All Files
Please note: Gold Standard Raters cannot see other users’ metadata within a file. For example,
they cannot view other users’ tags, comments, or keywords.
– My Files
2. Client Selector
Uploaders:
1. Electronic
2. FAX
3. App
Settings:
1. Update Profile
Help:
1. Support Query
2. KnowledgeBase

System Requirements

Hardware/Software Necessities:
In order to operate our applications, your computer needs to have the following software programs and functionalities:

1. Java Runtime Environment (JRE)
Version 1.6 or higher
This may be called Java 6
2. Adobe Flash Player
Version 11.6 or higher
Most recent release is best
3. Adobe Reader
Version 9 or higher
Adobe 11 is recommended
4. The ability to run overnight for long uploads
Computers that are scheduled to reboot or shutdown in the middle of the night will cause uploads to stall.
5. Computer or hard disk sleep modes are turned off

For best performance using our system, your computer should be and have:

1. A platform of Windows 7, Windows 8, Mac OSX 10.7, Mac OSX 10.8, or any higher Mac OSX
2. A monitor screen size of 15 inches or larger, and a screen resolution of at least 1024×768.

Network Settings:
In order to facilitate optimal performance, the following network setup items are recommended:

1. Allow HTTPS traffic through any district/school proxies or firewalls (HTTP over SSL on port 443).
2. Whitelist the IP address corresponding to behaviorimaging.com in any proxies or firewalls to avoid service interruptions.

Supported Browsers:
– Internet Explorer 9 +
– Latest version of Firefox
– Safari 5.1
– Latest version of Google Chrome

Adding a Role to a User

At any point in time, an Admin or a Group System Admin has the option of adding another role to an existing user.
Doing this will allow users access to new information and gain permissions that they did not have before.

Admins have the ability to add roles to Admins, Group System Admins, Group Admins, and Users.
Group System Admins can add roles to Group System Admins, Group Admins, and Users.

12

— To add a role to a user, an Admin or a Group System Admin must access their System Admin.
– After finding the user they’d like to edit, they can click on the pencil icon in the last column associated to that profile.
– Once the “Edit User” window has opened, they can go to the section listed as Role(s). Using the drop-down menu next to their current role will give options of adding another role to that user.
– The Admin or Group System Admin can then choose which one(s) they would like to add.

Note:
Gold Standard Raters, Scorers, Login Clients, and Clients cannot have more than one role.


By adding a new role for a user, they will now have to have two (or more) Group Associations.

– The Admin or Group System Admin must go to the second tab of the “Edit User” window and associate their user with a specific level depending on their new role.
— To switch from one role’s Group Associations to another within the same user, the Admin or Group System Admin can go to the upper right hand corner of the tab and click on the drop-down menu next to the word “Role”. An image has been provided below to show its locality.
— The drop-down menu will have a list of the roles that the user now has. Selecting one will show the Group Associations of that role.
— Following the How to Add a User article’s instructions regarding required Group Associations, the Admin or Group System Admin will add the new association for the new role of the existing user.

15

Note:
Adding new Group Associations to the new role will not affect the other role or their Group Associations.

Changing a Role of a User

At any point in time, an Admin or a Group System Admin has the option of changing a role of a user.

Admins have the ability to change a user from any role to any new role.
Group System Admins may change a user in their system to any role other than Admin.

— To do this, an Admin or a Group System Admin must access their System Admin.
– After finding the user they’d like to edit, they can click on the pencil icon in the last column associated to that profile.
– Once the “Edit User” window has opened, they can go to the section listed as Role(s). Using the “X” next to their current role will delete it.
– The Admin or Group System Admin can then choose a new role for their user.

2

*Friendly Reminder: Admins and Group System Admins should make sure that their user is now assigned correctly in their Group Associations according to their new role.
The How to Add a User article shows the required group associations of each role.

Notes:
Changing a Login Client to a Client: The Login Client’s “Client’s Files” and “Private Files” folders will move into the Client’s portfolio with all of its contents.
*Friendly Reminder: Clients’ portfolios are private and only accessible with permission from the Admin.
Changing a Client to a Login Client: All contents of the Client will move into the “Private Files” folder of the Login Client’s portfolio.
*Friendly Reminder: The Login Client’s portfolio has a “Private Files” folder that is only accessible to users who have permission from the Admin. The “Client’s Files” folder is accessible to users and that particular client to review.

4

How to Set Up to Receive Notifications Regarding a Client

Notifications are an easy way to stay on top of changes to clients. If you have access to a client you can set notifications for them.  Admin roles can even be notified of changes to all user roles available in the system admin window.


Setting Notifications with the Client Selector (user roles):

  1. Open the Client Sector.
  2. Click the “pencil icon” next to the client you wish to set notifications for.
    Click the pencil to set notifications for that client.
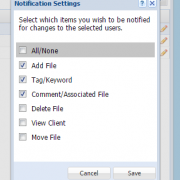
  3. Check the boxes you wish to be notified for. Press save when complete.
    notification settings
  4. Complete! Now every time one of the selected changes happens to that client you will receive an email and your notifications menu option will become red.
    notifications button

Setting Notifications with the System Admin (admin roles only):

  1. Open the System Admin.
    systemadmin
  2. Click the check box of the “Client” or “User” you wish to receive notifications for.
    checkbox
  3. Go to Actions and click Configure Notifications.
  4. Check the changes you wish to be notified for. Press save when complete.
    notification settings
  5. Complete! Now every time one of the selected changes happens to that client you will receive an email and your notifications menu option will become red.
    notifications button


Inter-rater Observational Workflow using Reports

Inter-rater Observation can be performed by an Admin or Group System Admin viewing the Tag or Keyword reports and using excel to filter the results.

Inter-rater Observation can also be done by using the Data Viewer as an Admin. Click here to see how.

  1. Create two Scorer roles.
    Add Scorer Role

    Set “Scorer” as the role when creating a new user.

  2. Associate a Client or Login Client to that Scorer Role.”Scorer assign Keywords and/or Tags to the video. (Scorer role is blinded to other scorer annotations)
    Associate Client to both Scorers

    Associate Client to both Scorers

  3. Scorer adds tags and keywords to the video in the Client’s folder.
    Scorer Adds Annotations to Client Video.

    Scorer adds annotations to client video.

  4. Admin logs into the system and exports the Tag or Keyword report.
    Export Tag or Keyword Report

    Admin can export Tag or Keyword report.

  5. Use Excel to filter the results for the filename you want to review.
    Filter columns in excel for the filename you want to compare.

    Filter columns in excel for the filename you want to compare.

  6. Look for discrepancies in the report between scorers.
    Use the filtered results to compare annotations between scorers.

    Use the filtered results to compare annotations between scorers.

Inter-rater Observational Workflow using Data Viewer

Inter-rater Observation can be performed by an Admin or Group System Admin viewing two scorer’s annotations on the same client video.

Inter-rater Observation can also be done by using the Tag or Keword reports. Click here to see how.

  1. Create two Scorer roles.
    Add Scorer Role

    Set “Scorer” as the role when creating a new user.

  2. Associate a Client or Login Client to that Scorer Role.”Scorer assign Keywords and/or Tags to the video. (Scorer role is blinded to other scorer annotations)
    Associate Client to both Scorers

    Associate Client to both Scorers

  3. Scorer adds tags and keywords to the video in the Client’s folder.
    Scorer Adds Annotations to Client Video.

    Scorer adds annotations to client video.

  4. Admin logs into the system and reviews the annotations.
    Admin Opens Client video and see both scorers annotations.

    Admin opens Client video and see both scorers annotations.

  5. Admin can see the discrepancy or similarity of annotations applied to the same evidence.


Support Query

The Support Query is a direct line to the support team. You can ask questions or mention a problem that you are having.


Screen Shot 2017-03-08 at 10.41.37 PM1. Contact Email:
This will be copied from your account.  This can be edited if you want to use another email to communicate with.

2. Question / Issue Description:
Type in your question or issue here.
– Questions:
+ Please use specifications in your question so that we may better understand them.
– Issues:
+ Please describe your issue with as much detail as possible.
+ Include the steps that you took that created the issue.

3. Send Button:
Hit the Send button when you are ready to send the issue or question you have for the support team.

Please allow up to 24 hours for a Support Technician to respond by e-mail.