Posts

How to Set an Auto-Stop Length

Screen Shot 2017-04-24 at 12.04.12 AMThe Auto-Stop feature allows you to choose how long you’d like the app to record for before it automatically stops.
This allows you to participate in the video without having to manually stop the recording yourself.

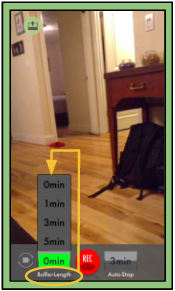
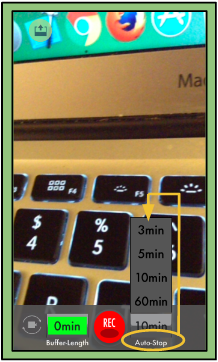
1. On the Recording Screen will be the set time of “3 min” for the auto-stop.
2. Tap on the “3 min” button and a menu will pop up showing the options of three minutes, five minutes, ten minutes, and sixty minutes.
3. Tap on the option you would like:
Three minutes will record the three minutes after you hit the record button and then automatically stop recording.

Once you have selected an option you can record your video.

Please note: You may use the Stop button at any time to stop recording your video. You do not have to wait for the auto-stop to occur.


How to Import A File From Your Personal Photo Gallery

This feature allows you to send a personal file from your phone to your personal account on Connect™.

Screen Shot 2017-04-23 at 11.21.34 PM1. Open the app, which will bring you to the recording screen.
2. Tap the Upload button on the top left corner to bring you to the uploading screen.
3. Press the second to last button on the toolbar to access your personal photo gallery (shown at right).
4. Choose the file you wish to upload.
5. Wait for your file to finish compressing.
6. Once finished, you can continue uploading the file as you would normally (click here for more information on uploading).

Please note: A popup will occur with a HIPAA recommendation after the file is compressed. Press the “Ok” button to continue uploading.

How to Set a Buffer Length on Your Video

Buffer-Length allows you to set a certain time-length in which the video will start recording before pressing the record button.
This allows you to capture moments leading up to a child’s reaction to a certain event.

Screen Shot 2017-04-23 at 10.52.51 PM1. On the Recording Screen will be the set time of “1 min” for the buffer-length.
2. Tap on the “1 min” button and a menu will pop up showing the options of zero minutes, one minute, three minutes, and five minutes.
3. Tap on the option you would like:
Three minutes will record the three minutes before you hit the record button.
4. You will see a bar start moving forward, showing that the buffer-length has been set and is recording.
5. Once the buffer-length has finished recording the minutes you chose to capture, it will turn green.

When you press play, your video will continue from the set amount of minutes of the buffer-length.

Fax Uploader

The Fax Uploader allows a user to create a coversheet in order to fax a document to the system and add it to their File Organizer.

Screen Shot 2016-11-06 at 11.55.33 PM

1. Within the fax upload window, there are two boxes in which to enter information:
Title Field: A place for the user to enter the name of the file.
Comment Field: A place for the user to add any notes they’d like other users who can access their file to see (optional).

2. After filling out the information, the user will click the Create Fax Cover button.

3. This brings up a created PDF file with the username of the user and the title and the comment previously filled out.

4. Clicking on the printer button on the menu bar will print out the fax upload form.

5. The user must follow the instructions printed on it to fax their complete document.

6. The file will be uploaded into the user’s My Files folder.

Please Note:
The user needs to include the fax coversheet with the document they are faxing.

Best Practices for Recording

Here are a few best practices for recording with Behavior Capture™ on your iPhone, ipad, ipod touch.

  • Try to brighten the room where you are recording, such as opening windows and turning on all the lights.
  • We recommend using a tripod if available. It is ideal to keep the device as stable as possible to help capture the scenario.
  • Using a paired bluetooth remote to trigger capture recordings will stop you from having to fuss with the device.
  • Try to keep distracting noises to a minimum. Loud music, televisions, and outside conversations might make it hard to pick up subtle speech.
  • Keep your device plugged in to make sure the phone does not die during recording or uploading your evidence.
  • Make sure you have enough space on your device for large videos. If you’re recording long videos, you may want to delete unwanted videos and apps from the device. If the device is full, recording will stop or it will prevent a new recording from starting.

Parent Concerns Category

“Parent Concerns”  is one of the four categories that need to be recorded in order for a clinician to diagnose your child.


How to Record a “Parent Concerns” Video

– Record any time/activity that results in behavior that is of primary concern for you and that you would like to share with the clinician.
– Set up the camera ahead of time.
– In the first minute of recording please say out loud what you would like the clinician to see (“This is Johnny ignoring me;” or “This change causes a really bad temper tantrum”).
– Make sure the child being recorded is in view of the camera. If necessary move the camera around but try not to be obviously filming the child.

Play with Others Category

“Play with Others”  is one of the four categories that need to be recorded in order for a clinician to diagnose your child.


How to Record a “Play with Others” Video

– Record your child playing with a sibling (or with you if no siblings).
– Set up five fun items (toys/books/NO ELECTRONICS).
– Mount camera so both play partners and the toys are in view and the child is facing camera.
– Briefly interact with the child (say his name; direct his attention to sibling; offer a toy- hold it out but don’t give it to him) and then wait for his reaction.
– After a few minutes let the children play. If no sibling, play with the child but let him guide the play.

Family Meal Time Category

“Family Meal Time” is one of the four categories that need to be recorded in order for a clinician to diagnose your child.


How to Record a “Family Meal Time” Video

– Record any family meal time.
– Mount the camera ahead of time.
– Make sure everyone is in the frame and the child is facing the camera.
– Interact with each other like you normally do.
– Interact with the child at least four times (say his name; offer food/drink; ask him to look at something and point to it; look at him and smile, see if he smiles back).
– Other family members should also interact with the child, but do not overdo it (if the child starts to talk/interact, let him guide the interaction).