Posts

Electronic Uploader

The Electronic Uploader is where a user can upload files that are on their computer to the site. The files can be placed in the user’s own My Files folder or a client’s My Files folder.

12313


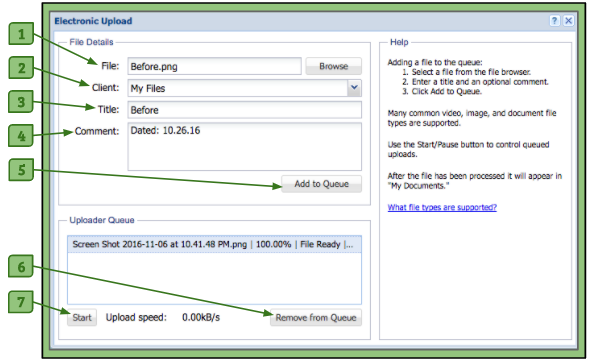
1. File/Browse Button
– When clicked, it accesses the files on the user’s computer in order add one to their File Organizer.

2. Client Drop-Down Menu
– Allows the user to choose the destination of the file they are uploading.

3. Title Field
– Allows the user to add a title to their file other than what it is named on the computer.

4. Comment Field
– Allows the user to add any notes they’d like other users who can access their file to see.

5. Add to Queue Button
– When clicked, starts the uploading of the file if there are no others being uploaded or adds it to the list of files that will be uploaded.

6. Remove from Queue Button
– Allows the user to remove any file that has finished uploading, is waiting to be uploaded, or is in the process of being uploaded from the queue.

7. Start/Pause Button
– Allows the user to start/pause any files at any time that are currently being uploaded to the File Organizer. Only one file may be uploaded at a time.


Adding a File to the Queue

1. Select a file from the file browser.

2. Select a client (optional).

3. Enter a new title (optional).

4. Enter a comment (optional).

5. Click the Add to Queue button.

Please Note:
1. All files will be uploaded to the user’s own My Files folder if a client is not selected.
2. Users may need to unblock pop-ups and click Run on windows that open. This depends on which browser and which security settings are being used.
3. Users should not close the Electronic Uploader window while there are active uploads. If closed, this will stop the upload process. However uploading will resume if once the window is reopened.
4. If a wrong file is selected and needs to be removed, users can click on the file in the upload queue and then click the Remove from the Queue button.


How to Add a File to a Client

For all user roles including administrators, there are two ways to add a file to a client:

Directly Uploading to a Client’s Portfolio

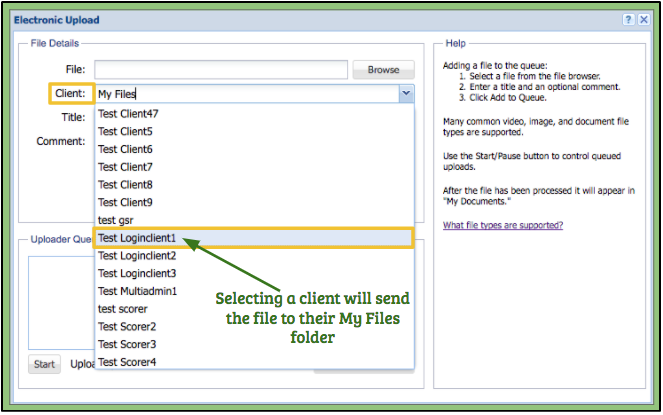
By putting in a client’s name in the Electronic Uploader, the uploaded file will be added to the client’s My Files folder. The user can find the client by using the arrow for the drop-down menu or by typing in the client’s name in the text field. For more information on how to use the Electronic Uploader, please click on the link.

Screen Shot 2017-01-02 at 2.39.23 AM


Transferring Files to a Client’s Portfolio

Administrator roles will use the System Admin Window while user roles will use the Client Selector.

Administrator’s System Admin Window:

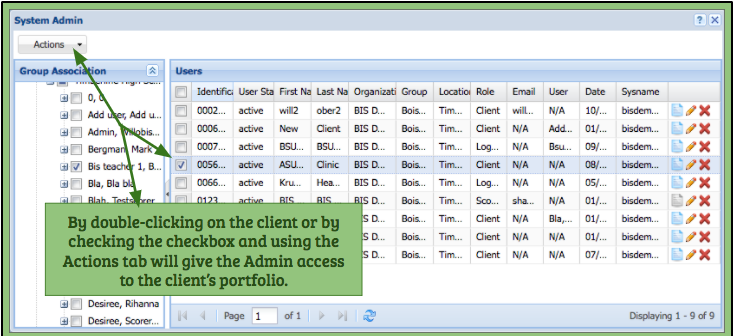
An admin may go to their System Admin Window and either double-click on the client or select the checkbox next to them and use the Actions tab. Both ways will open their portfolio.

Screen Shot 2017-01-02 at 3.13.16 AM

User’s Client Selector Window:

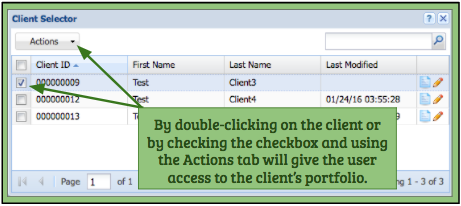
A user may go to their Client Selector and either double-click on the client or select the checkbox next to them and use the Actions tab. Both ways will open their portfolio.

Screen Shot 2017-02-26 at 7.11.39 PM

– Clicking on a client in either the Client Selector or the System Admin will allow the user access to the client’s portfolio in their File Organizer.
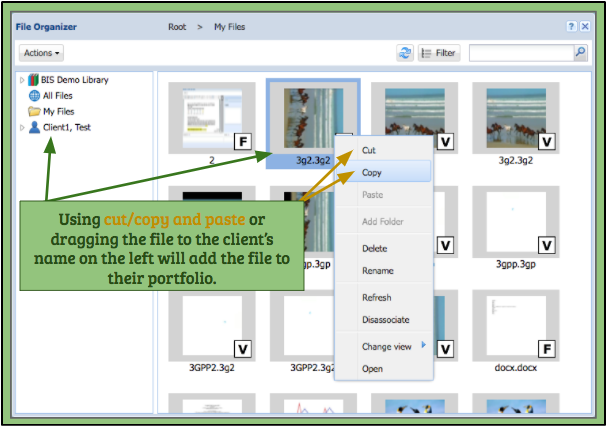
– The user can then go to their own My Files folder and find the file they want to give to their client.
– The user can then:
A. Right-click on the file and use copy/cut and paste it once inside the client’s portfolio.
B. Drag the file to the client’s name on the left. This will remove the file from the user’s My Files and add it to the client’s portfolio.
– Double-clicking on the client’s name on the left will open up their portfolio.
– For more information on the File Organizer, please click on the link.

Screen Shot 2017-01-02 at 3.46.15 AM

Parent Concerns Category

“Parent Concerns”  is one of the four categories that need to be recorded in order for a clinician to diagnose your child.


How to Record a “Parent Concerns” Video

– Record any time/activity that results in behavior that is of primary concern for you and that you would like to share with the clinician.
– Set up the camera ahead of time.
– In the first minute of recording please say out loud what you would like the clinician to see (“This is Johnny ignoring me;” or “This change causes a really bad temper tantrum”).
– Make sure the child being recorded is in view of the camera. If necessary move the camera around but try not to be obviously filming the child.

Play Alone Category

“Play Alone”  is one of the four categories that need to be recorded in order for a clinician to diagnose your child.


How to Record a “Play Alone” Video

– Record your child playing with toys/fun items (NO ELECTRONICS).
– Set up 5-10 toys.
– Mount the camera ahead of time and make sure the child/toys are in view and the child is facing the camera.
– Play with him briefly to get the play started (call his name; point to something saying “Look at that;” ask him where something is in the room, “Where’s the dog?”; try to get him to smile without touching).
– After each interaction, wait and see what he does. After a few minutes of interaction, let him play alone.

Play with Others Category

“Play with Others”  is one of the four categories that need to be recorded in order for a clinician to diagnose your child.


How to Record a “Play with Others” Video

– Record your child playing with a sibling (or with you if no siblings).
– Set up five fun items (toys/books/NO ELECTRONICS).
– Mount camera so both play partners and the toys are in view and the child is facing camera.
– Briefly interact with the child (say his name; direct his attention to sibling; offer a toy- hold it out but don’t give it to him) and then wait for his reaction.
– After a few minutes let the children play. If no sibling, play with the child but let him guide the play.

Family Meal Time Category

“Family Meal Time” is one of the four categories that need to be recorded in order for a clinician to diagnose your child.


How to Record a “Family Meal Time” Video

– Record any family meal time.
– Mount the camera ahead of time.
– Make sure everyone is in the frame and the child is facing the camera.
– Interact with each other like you normally do.
– Interact with the child at least four times (say his name; offer food/drink; ask him to look at something and point to it; look at him and smile, see if he smiles back).
– Other family members should also interact with the child, but do not overdo it (if the child starts to talk/interact, let him guide the interaction).

Accessory Suggestions

Here is a list of accessories that can help you while using the Behavior Capture™ app.

Click on the title of the accessory to view more information about it.

Stands:
– iPod/iPhone: Joby GripTight Micro Stand
– iPod/iPhone: Joby GripTight GorillaPod Stand
– iPad: GorillaMobile Yogi

Remotes:
– Satechi BT MediaRemote Bluetooth