Posts

Upload Times

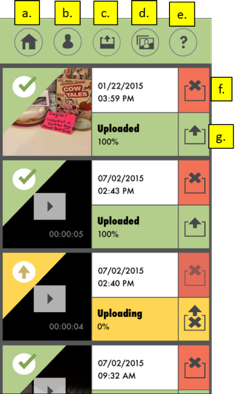
When uploading videos, the file size and network speed determine how fast your upload will be.

To get a general idea of how long your video will take to upload, use an uploading calculator and type in the size of your file and find the speed of your internet in the list.

To find out the speed of your internet, you can use a speed test to find the exact number.

One way to increase your uploading speed is to compress your files to be smaller or to record your videos with a lower resolution. There are a lot of third party softwares that compresses videos.

If you are able to use the Behavior Capture app then this also compresses videos on iPhones and iPads.

Once your videos are “encoding” they are in the system and it will begin making them web ready.
You can log out at this point if you wish and wait for the system to email you when it is available.

How to Set an Auto-Stop Length

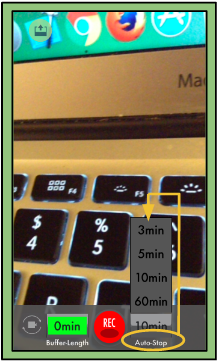
Screen Shot 2017-04-24 at 12.04.12 AMThe Auto-Stop feature allows you to choose how long you’d like the app to record for before it automatically stops.
This allows you to participate in the video without having to manually stop the recording yourself.

1. On the Recording Screen will be the set time of “3 min” for the auto-stop.
2. Tap on the “3 min” button and a menu will pop up showing the options of three minutes, five minutes, ten minutes, and sixty minutes.
3. Tap on the option you would like:
Three minutes will record the three minutes after you hit the record button and then automatically stop recording.

Once you have selected an option you can record your video.

Please note: You may use the Stop button at any time to stop recording your video. You do not have to wait for the auto-stop to occur.


How to Import A File From Your Personal Photo Gallery

This feature allows you to send a personal file from your phone to your personal account on Connect™.

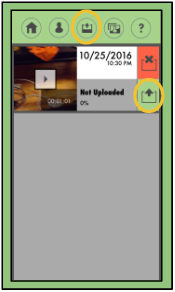
Screen Shot 2017-04-23 at 11.21.34 PM1. Open the app, which will bring you to the recording screen.
2. Tap the Upload button on the top left corner to bring you to the uploading screen.
3. Press the second to last button on the toolbar to access your personal photo gallery (shown at right).
4. Choose the file you wish to upload.
5. Wait for your file to finish compressing.
6. Once finished, you can continue uploading the file as you would normally (click here for more information on uploading).

Please note: A popup will occur with a HIPAA recommendation after the file is compressed. Press the “Ok” button to continue uploading.

How to Set a Buffer Length on Your Video

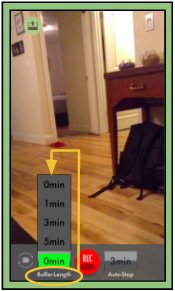
Buffer-Length allows you to set a certain time-length in which the video will start recording before pressing the record button.
This allows you to capture moments leading up to a child’s reaction to a certain event.

Screen Shot 2017-04-23 at 10.52.51 PM1. On the Recording Screen will be the set time of “1 min” for the buffer-length.
2. Tap on the “1 min” button and a menu will pop up showing the options of zero minutes, one minute, three minutes, and five minutes.
3. Tap on the option you would like:
Three minutes will record the three minutes before you hit the record button.
4. You will see a bar start moving forward, showing that the buffer-length has been set and is recording.
5. Once the buffer-length has finished recording the minutes you chose to capture, it will turn green.

When you press play, your video will continue from the set amount of minutes of the buffer-length.

The Encoding Process

After a file is uploaded, the word “encoding” will appear next to it.

All  files uploaded to the system go through the process of encoding. This process is when the file is being converted to a specific file extension, such as PDF, JPG, and WMV. The length of the video or the size of the file will be the deciding factor in how long the encoding process will take.

This process must be done in order for files to be viewed and played on the system.

Video Player’s Tag Feature

A tag can be added to video files only and are placed at specific time points in the video. Previously added tags are not editable. When changes have been made to the file, the “Save” button at the bottom right will turn green. A tack will appear at the specified time in order to provide easy access to the tagged point. All tags are author and time-stamped.


Adding a Tag

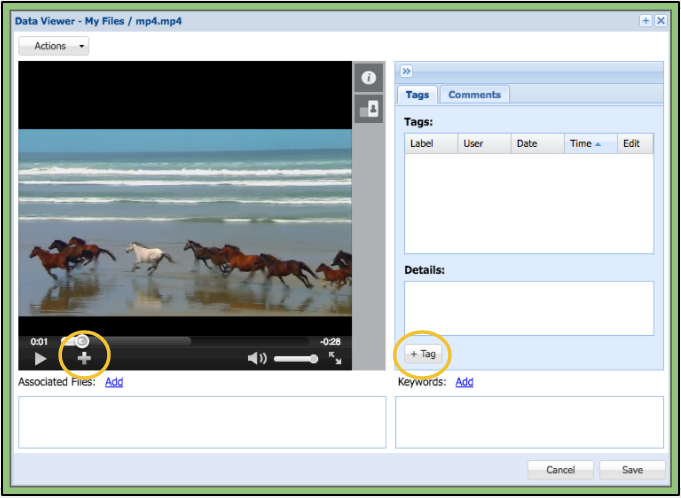
 1. The user can click on the plus sign at the bottom left corner of the video player or on the “+ Tag” button to the right of the player.
2. This will open the tag window where the user selects a previously used tag or creates a new tag to add if permission is given.
Screen Shot 2016-11-12 at 9.10.59 PM


Adding-a-Tag Window

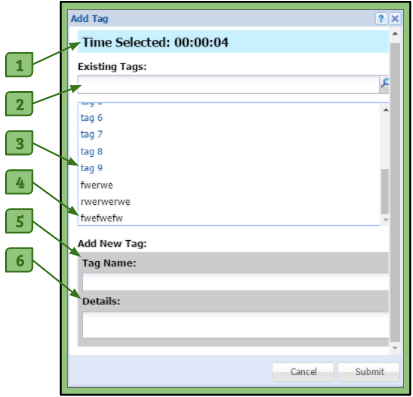
After clicking one of the options to add a tag the Adding a Tag window will pop up.

1. The user can click on an existing tag or create a new tag of their choice if permitted.
2. The user can fill in optional information in the Details field.
3. They can then click the submit button.
Screen Shot 2017-03-08 at 8.07.51 PM

1. Time Selected
– This shows the user what time the video is at and where the tag will be placed in the video.

2. Existing Tags Search
– If a user wants to use an Organizational tag or a pre-existing tag, the user can type in the name of the tag to find them.

3. “Blue” Organizational Tags
– The tags that are in blue are the organizational tags. These are the tags that are set for use by default and are available to all users with access to the Video Player.

4. Regular Tags
– Tags that are in black are tags that have been previously used by the user themselves.

5. Tag Name
– If a user has permissions to add their own tag, they can put in a name here that will add a tag to the video as well as the Existing Tags list for next time.

6. Details Section
– A user can add any comments or details they deem important for themselves or others who have access to view their tags.


Video Player’s Tag Section

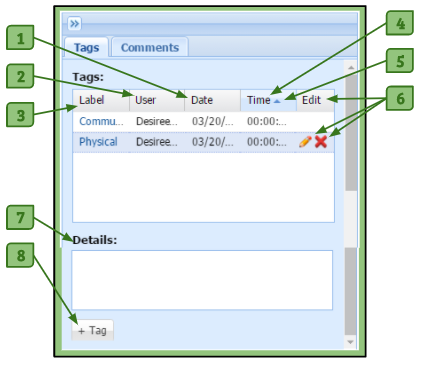
In order to add a tag, a user must go to the Video Player of the video they want to add a tag to. On the right is a section dedicated to the tags within the video.
Screen Shot 2017-03-08 at 8.53.53 PM

1. Date Column
– This is the date that the tag was added by the author.

2. User Column
– This is the name of the author of the tag. Hovering over the name of the author will provide the full name.

3. Label Column
– This is the name of the tag. Organizational tags will show up as blue and others as black. Hovering over the name of the label will provide the full name.

5. Time Column
– This is the point in time of the video that the tag appears.

5. Arrow Button
– Appears next to the column that the tags are sorted by. While hovering over a column’s title, another arrow will appear allowing you to sort by ascending or descending alphabetically.

6. Edit Column
– Provides options to either delete or edit a tag. Only tags that have been made during this session can be edited or deleted. Previous tags on the video file cannot be edited or deleted (gray tacks) All newly added tags (green tacks) can be dragged to the correct time and/or edited..
+ Pencil Icon: Clicking on this icon will open the “Edit Tag” window, where the user can edit the tag name and/or the details of the tag.
+ “X” Icon: Clicking on this icon will delete the tag.

7. Details Section
– This text box provides the comments on the tag selected that were written by the author of the tag at the time it was created.

8. “+ Tag” Button
– This button allows the user to add a new tag to the file.

Please note:
To remove all tags from the video file, go to the Copy File article.