Giving Users Access to Clients (Admins Only)

Behavior Connect is a role and permission based system. Every user will need permission to access clients within the system.

Screen Shot 2016-09-25 at 10.23.26 PM

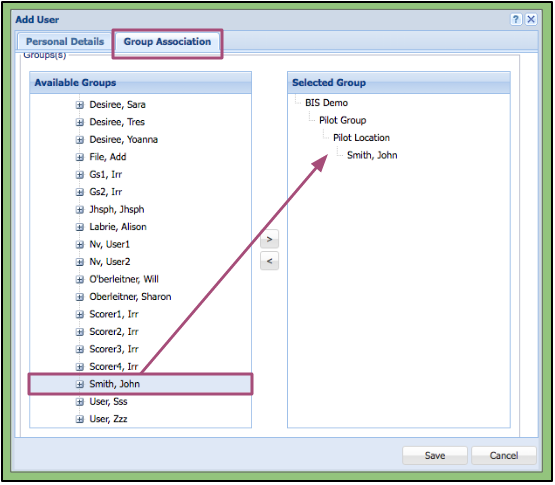
To give access for a client to a user, the Admin must first open the add/edit window for the client via the System Admin window.

1. Click on the Group Associations tab next to the Personal Details tab.
2. Select the user who needs access to the client from the lefthand column.
3. Move the user to the right-hand column, titled Selected Group.
– The Admin can do this by dragging and dropping or using the arrows.
4. Click the Save button.
The newly added user will now have access to the client’s portfolio. They can access the client from their Client Selector.

System Admin’s Search Feature

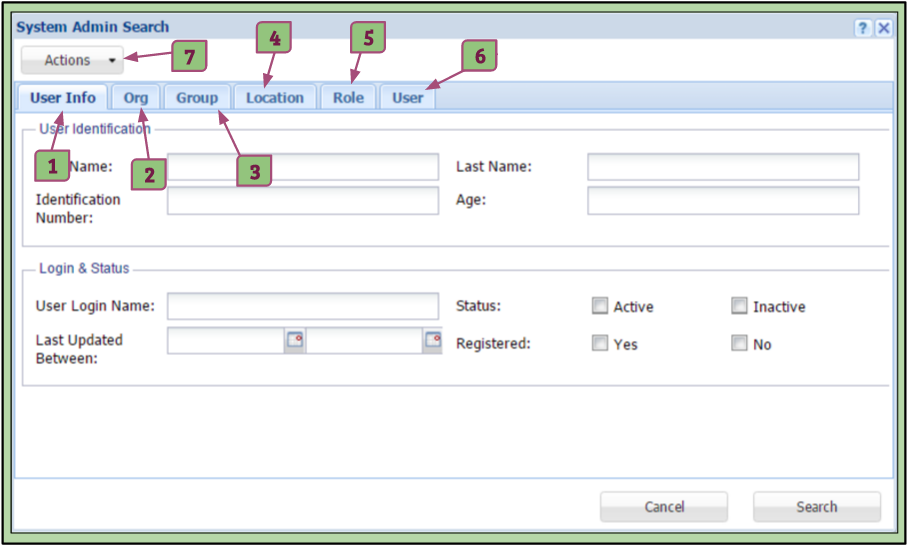
The search feature can be used to search/filter by the multiple types of criteria listed below:

Screen Shot 2016-09-24 at 10.59.04 PM

1. User Info Tab
– Allows the admin to search for a user/client using their personal information and/or their login and profile status.
A. First Name
B. Last Name
C. Identification Number
D. Age
E. User Login Name
F. Status:
Active
Inactive
G. Last Updated
H. Registered:
Yes
No

2. Organization Tab
– Allows the admin to search for a user/client using the organization they are in.

3. Group Tab
– Allows the admin to search for a user/client using the group they are in.

4. Location Tab
– Allows the admin to search for a user/client using the location they are in.

5. Role Tab
– Allows the admin to search for a user/client what role they are.

6. User Tab
– Allows the admin to search for a user/client using the name of the user they are under.

7. Actions Tab
– Allows the admin to clear the data from the fields on the current page or the entire search window.

Roles and Descriptions

The following roles are flexible to fit many organizations, schools and/or studies.

Client The client is the subject, student, or patient.

  • Clients can have files and assessments associated with them.
  • The client has no login or direct access to files and assessments.

Login Client This is a client that has the ability to login and upload files.

  • Login Client is only able to see and have access to all folders, files, and metadata under their “My Document” folder.
  • All Users that have access to the Login Client will be able to see and have access to all folders, files, and metadata under the client’s profile.
    • Note: For users to have access to client/login client profiles, the admin will need to add the association of user(s) within the client/login client role.

User The user can be a clinician, teacher, or caregiver. This is the core role for accessing the Behavior Connect™ system.

  • Users can choose different clients in the “Client Selector” that they have been assigned to by the admin.
  • Users can view other data associated to the clients by other roles.

Scorer The scorer role is similar to the user role but can only see metadata that they themselves have added to the client.

  • The scorer can complete assessments on a client and that scoring data can be compared with other scorers by other roles.

Gold Standard Rater – This role is designed to show comparison and differences between the scorers’ organizational tags.

  • The Gold Standard Rater has the same permissions as a scorer other than access to the Library in the File Organizer and the Notifications feature.

Group Admin – This role has access to multiple users and clients within a larger “group”. The group may be an individual site, an entire state, or a dispersed group of users.

  • Group admins cannot delete, edit or add users.
  • Group admins can only see users, clients, and libraries in their particular group.

Group System Admin – Like the group admin, the group system admin has access to multiple users and clients that are associated to their “group”.

  • Unlike the group admin, the group system admin can add and edit users and clients.
  • Group system admins have access to the whole system.

Admin – The admin is the account holder for the system.

  • The admin has complete access to the entire account.
  • Admins can add new roles and edit existing ones.
  • Admins can associate clients to users and users to groups.

How to Add a User (Admins Only)

By opening the System Admin, clicking on the Actions menu, and selecting “Add User”, the Admin will be able to create a new user for their system.

2


Personal Details Tab

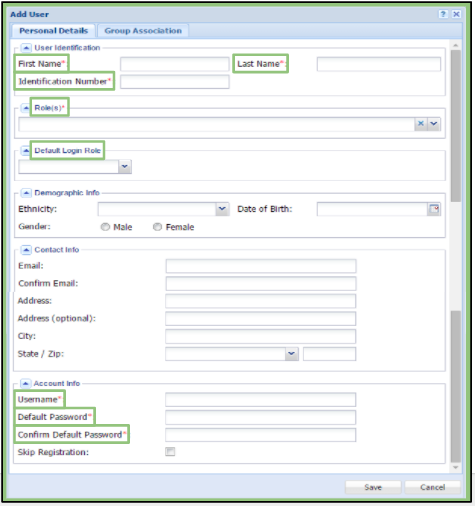
Required fields on both the Group Association and Personal Details tab are marked with a red asterisk (*). They can be seen in green below as well.

Screen Shot 2016-11-06 at 7.09.54 PMFirst Name
Last Name
Identification Number
Role(s)
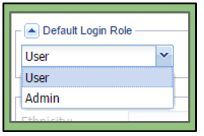
– Default Login Role
– Demographic Info
– Ethnicity
– Date of Birth
– Gender
– Contact Info
– Email
– Address
– City, State, Zip
– Account Info
Username
Password
– Skip Registration
   

Please Note:
   – Checking the ‘Skip Registration’ box allows an Admin to remove the steps of registering on the site for the user being added.

   – Users will be listed as “Not Registered” in the System Admin if this feature is used when creating them.
   – The Admin must add an email address in order for your user to receive any notifications. A reminder will pop-up after    clicking this box.


Group Association Tab

An Admin will need to associate the role with an Organization, Group, Location, and/or User, depending on the added role.

To associate, highlight the name needed in “Available Groups” from the left section and either drag and drop to the “User Groups” section or click on the arrows to transfer it.

Required Associations for Each Role:
Admin – Organization
Client – Group
Location
User
Please note by adding the user to a client, it gives the selected user access to the client.
Gold Standard Rater – Group and Location
Group Admin – Group
Group System Admin – Group
Login Client – Group and Location
Scorer – Group and Location
User – Group and Location

Please note that the system will notify the Admin if group association is not correct.

Keywords Feature

Screen Shot 2016-08-29 at 12.06.23 AM

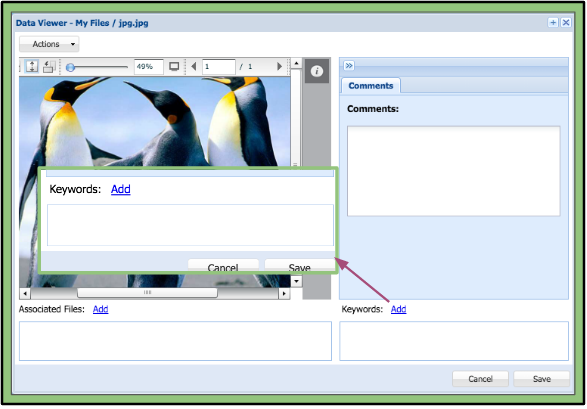
A keyword can be added to any file available with permissions to the user. This feature provides another form of metadata to add to the file. Many users use this feature to add a weight to the file. For example: Severity 1, Severity 2, etcetera. All keywords will be author and timestamped. Keywords can be added to all file types.


Adding a Keyword

1. Clicking the add button next to the section entitled Keywords will open a new window.
+ Organizational keywords will appear in blue at the top of the will appear in blue at the top of the list if any are available.
+ A user’s previously used keywords will be listed under the organizational keywords.
+ If a user has permission to do so, they can create their own custom keywords.
2. Select or create the keywords and click the submit button to add them to the file.


Viewing Keywords

– Added keywords will show up in the window below the section entitled Keywords.
– If a user hovers over a keyword, the name of the author and time it was created will pop-up.


Screen Shot 2016-08-28 at 10.34.55 PMRemoving a Keyword

1. To remove a keyword, click on the “X” next to the keyword’s name.
Please note a user will only be able to remove keywords they are currently adding before the click on the Save button.
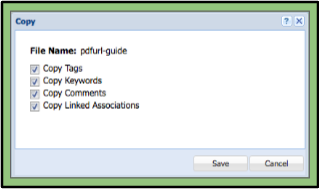
2. When creating a copy of the file, a user will have an opportunity to remove all the keywords only at that time.

Associated Files Feature

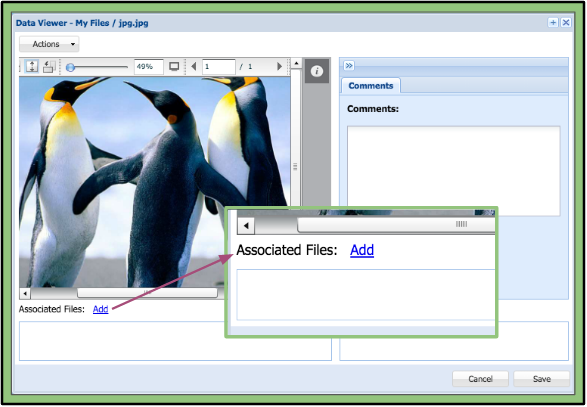
Screen Shot 2016-08-28 at 10.57.49 PMFor reference, a user can associate a different file to the file they are viewing. After saving the file they are viewing, each file will then be associated with the other. Associated files can be added to any uploaded file available with permissions for the user.


Adding an Associated File

1. Click on the highlighted text “add” next to the Associated Files section. This will open the File Organizer.
2. Double click on the file you would like to add. This will add the file to the Associated File field.
3. Click the Save button to complete the action.


Screen Shot 2016-08-28 at 10.34.55 PMRemoving an Associated File

1. Click on the “X” next to the associated file’s name to remove the file from the file you are currently viewing.
Please note that a user will only be able to remove the associated file(s) the currently are adding before they click the Save button.
2. When creating a copy of the file, a user will have an opportunity to remove all associated files only at that time.


File Organizer’s All Files Feature

The All Files feature allows a user to see all of the files that they have can permission to access. All of the files appear at one time , regardless of the folder locations they are in or the clients they are under.

To find the All Files feature:

  1. Click on “Actions” on the main toolbar.
  2. Select “File Organizer”.
  3. When the File Organizer window opens, click on “All Files” on the left sidebar.

Features

Screen Shot 2017-03-08 at 7.53.31 PM

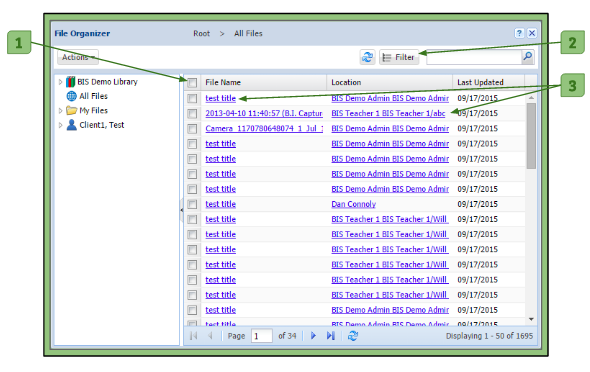
3. Checkboxes
A user can click on the checkboxes next to the files if they want to copy and paste them to a new location. After clicking the boxes, they can use the action button in the top left corner to complete the process.

2. Advanced Filter
If a user wants to do an advanced search to narrow down the files they want to survey, they can click on “Filter”. They will be able to search for specific criteria such as:

– Organization (Org)
– Group
– Location
– Role
– User/Client
– ID Number
– File Type
– Tags
– Keywords
– Updated Between

3. Links
– A user can open a file directly by clicking on the given “File Link” name link.
– A user can access a file’s current location by clicking on the “Location” link.


Administrative Roles

There are three types of roles available for an administrator:

  • Basic Admin role
  • Group Admin role
  • Group System Admin role

Admin

The Admin role has access to all users, folders, files and data of the entire Enterprise Account. The admin has the tools to add, delete, and edit all users, files, and folders within the system.


Admins have complete access to the entire account.
This includes the following tabs:

Actions:
1. System Admin
Client Notepad
2. File Organizer
– Library
– All Files
– My Files
Upload:
1. Electronic
2. FAX
3. App
Reports:
1. Reports
Notifications:
1. Notifications
Settings:
1. Update Profile
Help:
1. Support Query
2. KnowledgeBase


Admins are able to add, edit, and delete all users and clients.
This includes the following:
– Other Admins
– Group System Admins
– Group Admins
– Scorers
– Gold Standard Raters
– Users
– Login Clients
– Clients


Admin’s are able to associate the following with each other:
– Clients/Login Clients with Users
– Clients/Login Clients with Scorers
– Clients/Login Clients with Gold Standard Rater
– Users with Locations
– Group Admins with Groups
– Group System Admins with Groups
– Scorers with Locations
– Gold Standard Rater with Locations


Group Admin

The Group Admin role has access to all users, folders, files, and data in their assigned Group(s). Group Admins have access to only the Group(s) they are associated to within the account. Unlike the Admin role, the Group Admin role cannot add, delete, or edit users and clients.

Group Admin’s accessibility includes the following tabs:

Actions:
1. System Admin
Client Notepad
2. File Organizer
– Library
– All Files
– My Files
Upload:
1. Electronic
2. FAX
3. App
Reports:
1. Reports
Notifications:
1. Notifications
Settings:
1. Update Profile
Help:
1. Support Query
2. KnowledgeBase


Group Admins can view these roles that are only within their group:
– Group System Admins
– Other Group Admins
– Scorers
– Gold Standard Raters
– Users
– Clients
– Login Clients


Group System Admin

The Group System Admin role has access to all users, folders, files, and data of their associated Group.
Group System Admins have access to only the Group(s) they are associated to within the account. Unlike the Group Admin, the Group System Admin has the tools to add, delete, and edit the users and clients within their group.

Group System Admin’s accessibility includes the following tabs:

Actions:
1. System Admin
Client Notepad
2. File Organizer
– Library
– All Files
– My Files
Upload:
1. Electronic
2. FAX
3. App
Reports:
1. Reports
Notifications:
1. Notifications
Settings:
1. Update Profile
Help:
1. Support Query
2. KnowledgeBase


Group System Admins can delete, add, and edit users that are only within their group.
This includes the following users and clients:
– Other Group System Admins
– Group Admins
– Scorers
– Gold Standard Raters
– Users
– Login Clients
– Clients


Group System Admins can add associations to users only within their group.
Admin’s are able to associate the following with each other:
– Clients/Login Clients with Users
– Clients/Login Clients with Scorers
– Clients/Login Clients with Gold Standard Rater
– Users with Locations
– Scorers with Locations
– Gold Standard Rater with Locations
– Group Admins with Groups
– Group System Admins with Groups