Recording Screen

Picture1

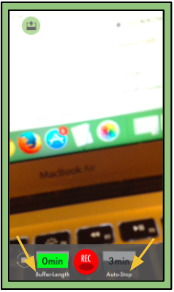
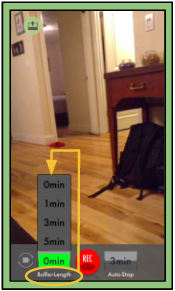
The recording screen allows the client to record evidence before pressing the actual record button. It will also allow the client to auto-stop their video on its own.

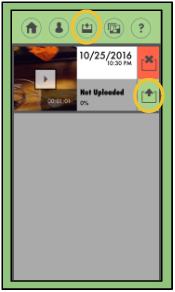
A. Upload Menu: Allows the user/login client to access the upload menu in order to upload their video evidence.
B. Switch Camera View: Allows the user/login client to change the camera from facing the user/login client or away from the user/login client.
C. Buffer-Length: Sets how far back the capture will include before pressing record.
    1. Options:
——> 0 minutes
——> 1 minute
——> 3 minutes
——> 5 minutes

D. Record/Stop: If the user/login client is recording, pressing this button will stop the recording. If camera is not recording, pressing this button will start a recording.
E. Auto-Stop: Sets a timer for when the app will automatically end the app.
    1. Options:
——> 3 minutes
——> 5 minutes
——> 10 minutes
——> 60 minutes

Please note when the app is in recording mode the screen will be outlined in green.

Upload Times

When uploading videos, the file size and network speed determine how fast your upload will be.

To get a general idea of how long your video will take to upload, use an uploading calculator and type in the size of your file and find the speed of your internet in the list.

To find out the speed of your internet, you can use a speed test to find the exact number.

One way to increase your uploading speed is to compress your files to be smaller or to record your videos with a lower resolution. There are a lot of third party softwares that compresses videos.

If you are able to use the Behavior Capture app then this also compresses videos on iPhones and iPads.

Once your videos are “encoding” they are in the system and it will begin making them web ready.
You can log out at this point if you wish and wait for the system to email you when it is available.

How to Set an Auto-Stop Length

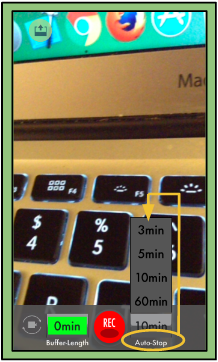
Screen Shot 2017-04-24 at 12.04.12 AMThe Auto-Stop feature allows you to choose how long you’d like the app to record for before it automatically stops.
This allows you to participate in the video without having to manually stop the recording yourself.

1. On the Recording Screen will be the set time of “3 min” for the auto-stop.
2. Tap on the “3 min” button and a menu will pop up showing the options of three minutes, five minutes, ten minutes, and sixty minutes.
3. Tap on the option you would like:
Three minutes will record the three minutes after you hit the record button and then automatically stop recording.

Once you have selected an option you can record your video.

Please note: You may use the Stop button at any time to stop recording your video. You do not have to wait for the auto-stop to occur.


How to Record a Video

Screen Shot 2017-04-23 at 11.45.45 PM1. Open the app, which will take you to the recording screen.
2. Choose a Buffer-Length and an Auto-Stop length.
3. Press the record button when an event is happening you wish to document.
4. Press the stop button or wait for the Auto-Stop to occur.

Your video will now be saved to the app and you may upload it to send to your secure account on Behavior Connect™.

How to Import A File From Your Personal Photo Gallery

This feature allows you to send a personal file from your phone to your personal account on Connect™.

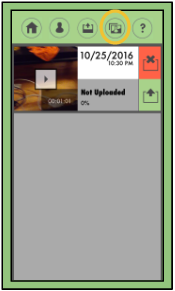
Screen Shot 2017-04-23 at 11.21.34 PM1. Open the app, which will bring you to the recording screen.
2. Tap the Upload button on the top left corner to bring you to the uploading screen.
3. Press the second to last button on the toolbar to access your personal photo gallery (shown at right).
4. Choose the file you wish to upload.
5. Wait for your file to finish compressing.
6. Once finished, you can continue uploading the file as you would normally (click here for more information on uploading).

Please note: A popup will occur with a HIPAA recommendation after the file is compressed. Press the “Ok” button to continue uploading.

How to Set a Buffer Length on Your Video

Buffer-Length allows you to set a certain time-length in which the video will start recording before pressing the record button.
This allows you to capture moments leading up to a child’s reaction to a certain event.

Screen Shot 2017-04-23 at 10.52.51 PM1. On the Recording Screen will be the set time of “1 min” for the buffer-length.
2. Tap on the “1 min” button and a menu will pop up showing the options of zero minutes, one minute, three minutes, and five minutes.
3. Tap on the option you would like:
Three minutes will record the three minutes before you hit the record button.
4. You will see a bar start moving forward, showing that the buffer-length has been set and is recording.
5. Once the buffer-length has finished recording the minutes you chose to capture, it will turn green.

When you press play, your video will continue from the set amount of minutes of the buffer-length.

File Organizer

The File Organizer is where all login users can manage all of their files. It provides a place to store and view uploaded files and work on a client’s portfolio and to collaborate with other users associated with that client.

File Organizer’s Location:

  1. Click on “Actions” on the main toolbar.
  2. Select “File Organizer”.
  3.  The File Organizer pop-up window will open.

Features
Screen Shot 2017-03-08 at 11.31.36 PM

Screen Shot 2017-03-08 at 11.24.05 PM

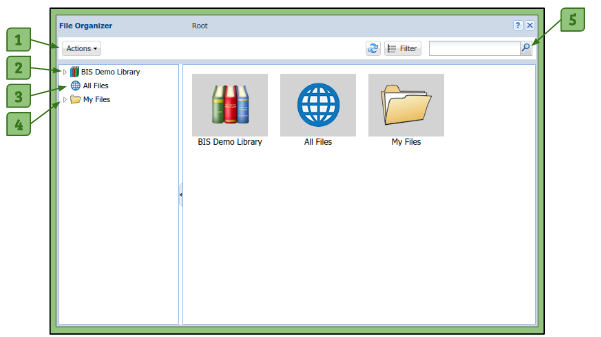
1. Actions Tab
– Cut: Allows a user to select a file and cut it to be pasted in another location.
Copy: Allows a user to create a replica of a file and paste the replica in another location.
+ “Dragging and Dropping” a file also creates a copy of the file.
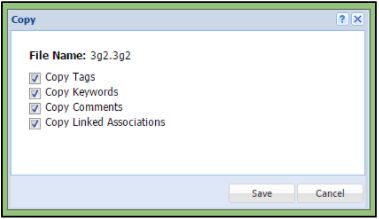
+ When creating a copy of a new file, a window will pop up (see bottom image) allowing you to create a copy with or without previously used Tags, Keywords, Comments, and Associated Files. To remove any one of these, uncheck the box next to the item you want removed.
Paste: Allows a user to place a cut or copied file within a certain folder.
Add Folder: Allows a user to add a new folder within another folder.
Delete: Allows a user to delete a file or a folder.
Rename: Allows a user to rename a file or folder that they have created or uploaded.
Refresh: Updates the view and files within the File Organizer window.
+ If a user uploaded a file and does not see it in an appropriate amount of time, they should click the refresh button. This will refresh the view of the current files available.
Disassociate: Allows a user to remove a client portfolio from the File Organizer window.
Screen Shot 2017-03-08 at 11.26.48 PMChange View: Allows a user to modify the viewing options of the files by any of the following:
+ Thumbnails
+ Details
+ List
Open: Allows a user to open a selected file.
+ Double-clicking on a file will also open the file.

2. Library

Admins and Group System Admins can place relevant documents in the Library for all account users, excluding login clients.
– All other specified users have read-only access to this folder.
– Yhe user can also click on the Library icon in the main box of the file organizer to open it.

3. All Files
– Provides a user with a view of all permissible files at one time. This makes it easier to find files without having to search through specific clients and folders.
– The user can also click on the All Files icon in the main box of the file organizer to open it.
– For more details on this feature, click here.

4. My Files
– This folder contains documents and files visible only to the user who is logged in.
– All documents and files uploaded by the user will appear here unless they select a client’s portfolio and upload directly to the client’s account.
– The user can also click on the My Files icon in the main box of the file organizer to open it.
– Users can create and manage additional folders within their My Files folder.

5. Search Field

– The search field allows the user to search for files by title from the selected folder. The filter tab can open to an advanced search feature.
Advanced search criteria includes:
a. Organization
b. Group
c. Location
d. Role
e. User/Client
f. ID Number
g. File Type
h. Tags
i. Keywords
j. Updated Between


Please note: When a user opens a client’s portfolio, it will appear as an icon as well as in the list of folders on the left.


 

SiteMap

Behavior Connect™ KnowledgeBase’s SiteMap